Automating Windows targets
Here are some common use cases that you can accomplish with Bolt on Windows targets.
Run a PowerShell script that restarts a service
To show you how you can use Bolt to reuse your existing PowerShell scripts, this guide walks you through running a script with Bolt, and then converting the script to a Bolt task and running that.
Before you begin
Ensure you’ve already installed Bolt on your Windows machine.
Identify a remote Windows target to work with.
Ensure you have Windows credentials for the target.
Ensure you have configured Windows Remote Management on the target.
The example script, called restart_service.ps1, performs common task of restarting a service on demand. The process involves these steps:
Run your PowerShell script on a Windows target.
Create an inventory file to store information about the target.
Convert your script to a task.
Execute your new task.
1. Run your PowerShell script on a Windows target
First, we’ll use Bolt to run the script as-is on a single target.
Create a Bolt project directory to work in, called
bolt-guide.Copy the
restart_service.ps1script intobolt-guide.-
In the
bolt-guidedirectory, run therestart_service.ps1script:bolt script run .\restart_service.ps1 W32Time --targets winrm://<HOSTNAME> -u Administrator -p
Note: The
-poption prompts you to enter a password.By running this command, you’ve brought your script under Bolt control and have run it on a remote target. When you ran your script with Bolt, the script was transferred into a temporary directory on the remote target, it ran on that target, and then it was deleted from the target.
2. Create an inventory file to store information about your targets
To run Bolt commands against multiple targets at once, you need to provide information about the environment by creating an inventory file. The inventory file is a YAML file that contains a list of targets and target specific data.
Inside the
bolt-guidedirectory, use a text editor to create aninventory.yamlfile and abolt-project.yamlfile. Theinventory.yamlfile is where connection information is stored, whilebolt-project.yamltells Bolt that the directory is a project and that it should load the inventory file from the directory.-
Inside the new
inventory.yamlfile, add the following content, listing the fully qualified domain names of the targets you want to run the script on, and replacing the credentials in thewinrmsection with those appropriate for your target:groups: - name: windows targets: - <ADD WINDOWS SERVERS' FQDN> - <example.mycompany.com> config: transport: winrm winrm: user: Administrator password: <ADD PASSWORD>Note: To have Bolt securely prompt for a password, use the
--password-promptcommand-line option without supplying any value. This prevents the password from appearing in a process listing or on the console. Alternatively you can use thepromptplugin to set configuration values via a prompt.You now have an inventory file where you can store information about your targets.
You can also configure a variety of options for Bolt in
bolt-project.yaml. For more information about configuration see Configuring Bolt. For more information about Bolt projects see Bolt projects.
3. Convert your script to a Bolt task
To convert the restart_service.ps1 script to a task, giving you the ability to
reuse and share it, create a task metadata file. Task
metadata files describe task parameters, validate input, and control how the
task runner executes the task.
Note: This guide shows you how to convert the script to a task by manually
creating the .ps1 file in a directory called tasks. Alternatively, you can
use Puppet Development Kit (PDK), to create a task by using the pdk new
task
command.
If you’re going to be creating a lot of tasks, using PDK is worth getting to
know. For more information, see the PDK
documentation.
-
In the
bolt-guidedirectory, create the following subdirectories:bolt-guide/ └── modules └── gsg └── tasks Move the
restart_service.ps1script into thetasksdirectory.In the
tasksdirectory, use your text editor to create a task metadata file — named after the script, but with a.jsonextension, in this example,restart_service.json.-
Add the following content to the new task metadata file:
{ "puppet_task_version": 1, "supports_noop": false, "description": "Stop or restart a service or list of services on a target.", "parameters": { "service": { "description": "The name of the service, or a list of service names to stop.", "type": "Variant[Array[String],String]" }, "norestart": { "description": "Immediately restart the services after start.", "type": "Optional[Boolean]" } } } -
Save the task metadata file and navigate back to the
bolt-guidedirectory.You now have two files in the
gsgmodule’stasksdirectory:restart_service.ps1andrestart_service.json-- the script is officially converted to a Bolt task. Now that it’s converted, you no longer need to specify the file extension when you call it from a Bolt command. -
Validate that Bolt recognizes the script as a task:
bolt task show gsg::restart_service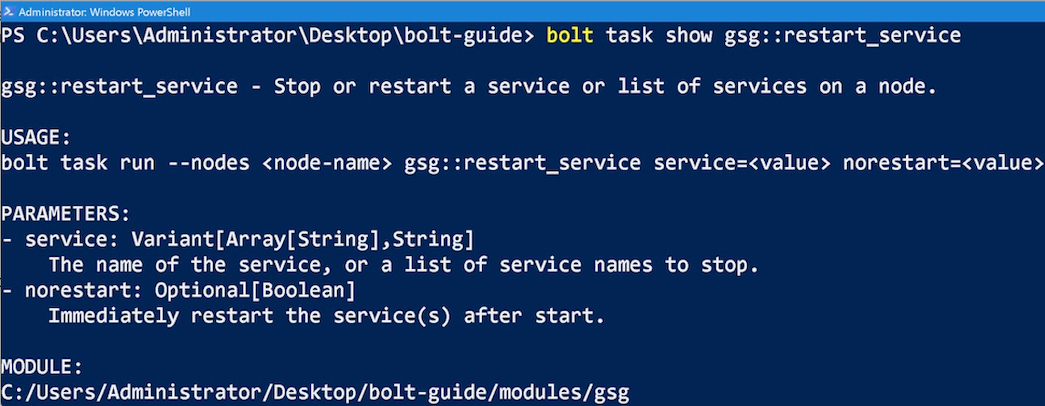
Congratulations! You’ve successfully converted the
restart_service.ps1script to a Bolt task. -
Execute your new task:
bolt task run gsg::restart_service service=W32Time --targets windows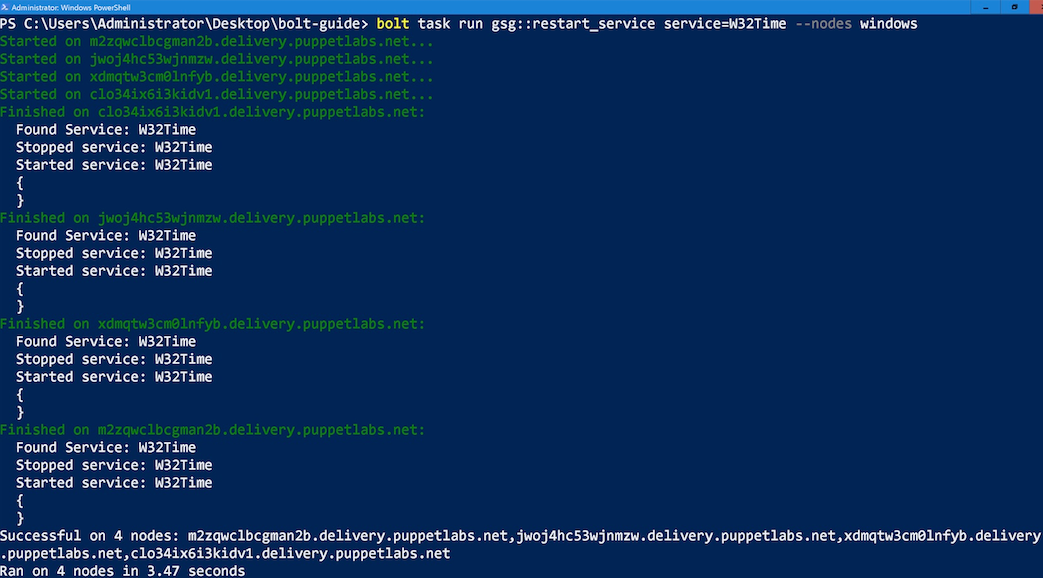
Note:
--targets windowsrefers to the name of the group of targets that you specified in your inventory file. For more information, see Specify targets.
Deploy a package with Bolt and Chocolatey
You can use Bolt with Chocolatey to deploy a package on a Windows target. First,
use the apply command to install Chocolatey on the target. Next, use Puppet's
Chocolatey package provider to install the package.
This example installs the Frogsay package on a Windows target.
Before you begin:
Configure Windows Remote Management (WinRM) on your Windows target.
To install the Frogsay package with Chocolatey:
-
Install the Chocolatey module to your Bolt project. This allows you to install Chocolatey to your target in the next step.
-
If you're using an existing Bolt project:
*nix shell command
bolt module add puppetlabs-chocolateyPowerShell cmdlet
Add-BoltModule -Module puppetlabs-chocolatey -
If you want to create a project (named
choco_project) that includes the Chocolatey module. Create a directory namedchoco_projectand run the following command inside the directory:*nix shell command
bolt project init chocho_project --modules puppetlabs-chocolateyPowerShell cmdlet
New-BoltProject -Name choco_project -Modules puppetlabs-chocolatey
-
-
Install Chocolatey on your Windows target using the
applycommand:*nix shell command
bolt apply -e 'include chocolatey' -t <TARGET URI> -u <USER> -p <PASSWORD> --transport winrmPowerShell cmdlet
Invoke-BoltApply -Execute "include chocolatey" -Targets <TARGET URI> -User <USER> -Password <PASSWORD> -Transport winrm -
Use the built-in Package task to install Frogsay on your target:
*nix shell command
bolt task run package -t <TARGET URI> -u <USER> -p <PASSWORD> --transport winrm action=install name=frogsayPowerShell cmdlet
Invoke-BoltTask -Name package -Targets <TARGET URI> -User <USER> -Password <PASSWORD> -Transport winrm action=install name=frogsay -
Run
frogsayon your target to test:*nix shell command
bolt command run 'frogsay ribbit' -t <TARGET URI> -u <USER> -p <PASSWORD> --transport winrmPowerShell cmdlet
Invoke-BoltCommand 'frogsay ribbit' -Targets <TARGET URI> -User <USER> -Password <PASSWORD> -Transport winrmYour output should look something like this:
Started on example.windowstarget.net...
Finished on example.windowstarget.net:
   STDOUT:

             WORRIED ABOUT LONG LINES? FROG CAN HOLD YOUR PLACE FOR UP TO 65534
             SECONDS BEFORE IT FORGETS WHAT IT'S DOING AND HOPS AWAY.
             /
       @..@
     (----)
     ( >__< )
     ^^ ~~ ^^
Successful on 1 target: example.windowstarget.net
Ran on 1 target in 2.19 sec
If you need to install packages on multiple targets, create a Bolt project with an inventory for your targets. Using an inventory allows you to group your targets together and dramatically simplifies Bolt commands.
📖 Related information
Do you have a real-world use case for Bolt that you'd like to share? Reach out to us in the #bolt channel on Slack.