Environment-based testing
The environment-based testing workflow lets you test new code before pushing it to production.
Setting up environment-based testing requires a specific node group hierarchy. Before setting up environment-based testing, make sure you understand Environment versus classification node groups and how to Create node groups.
- All Nodes (root node group of all node groups)
- All Environments (parent of all environment node groups)
- Production environment node group
- Staging environment node group
- Test environment node group
- Test environment one-time run exception node group (Used to Test code with canary nodes and alternate Puppet environments)
- Development environment
- Development environment one-time run exception node group (Used to Test code with canary nodes and alternate Puppet environments)
- PE Infrastructure node group
- Classification node groups and their children (Child groups can be used to Test and promote a parameter or Test and promote a class)
- All Environments (parent of all environment node groups)
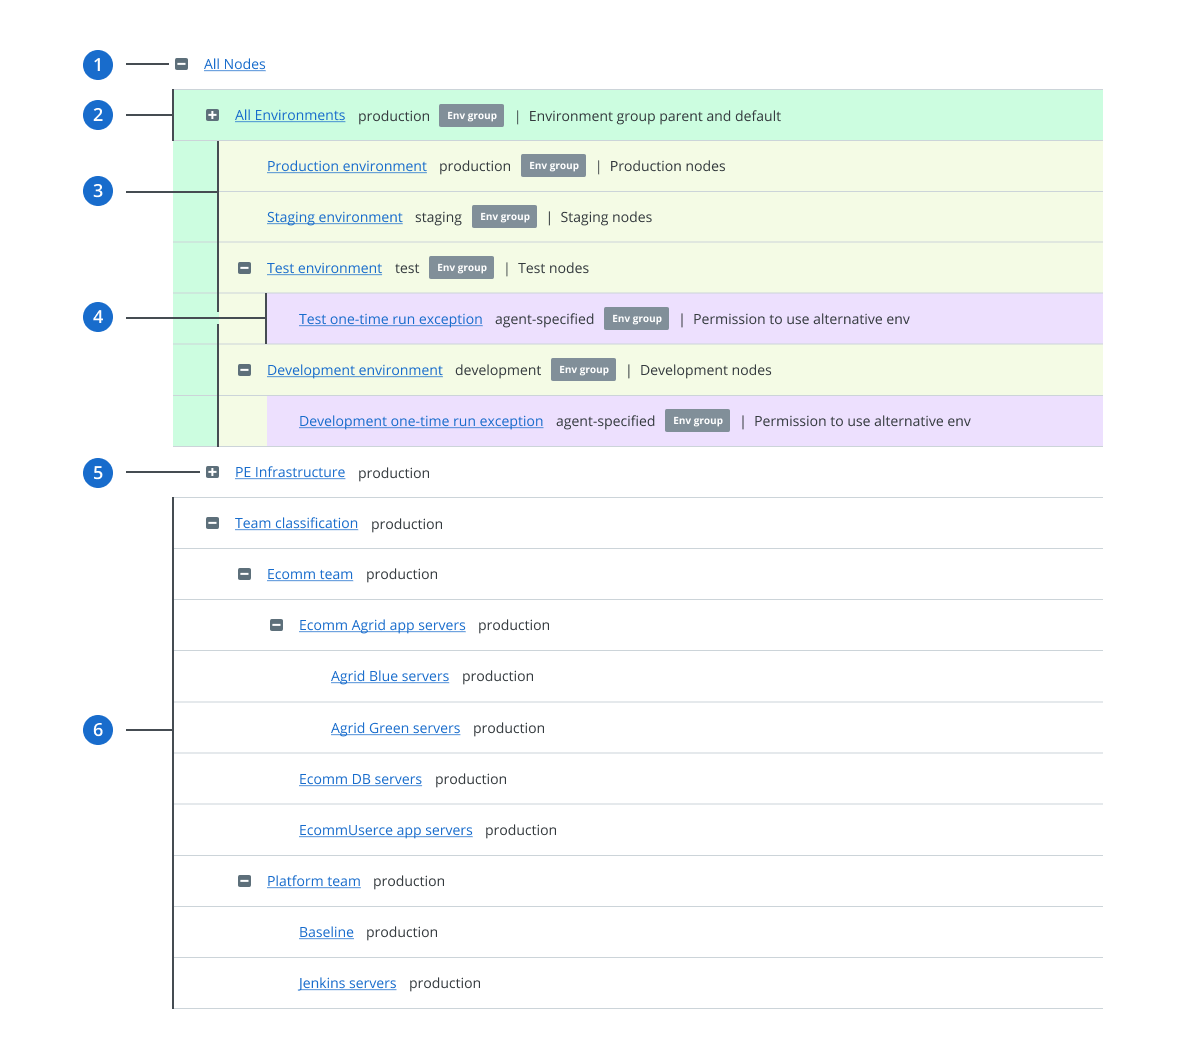
| Call-out label | Group name or category | Description |
|---|---|---|
| 1 | All Nodes | Root node group of all node groups. Its direct children are the All Environments node group, the PE Infrastructure node group, and the top-level classification node groups. |
| 2 | All Environments | Each environment node group must be a child of this group. The
Puppet environment assigned to
this group is the default Puppet
environment used for nodes without an assigned or matched default
environment.
Tip: If this group doesn't exist, create
it.
|
| 3 | Various environment node groups, each being direct children of All Environments | Environment node groups specify the Puppet environment that your nodes belong to. Nodes can belong to only one environment node group, which determines the node's default environment. |
| 4 | Optional one-time run exception group, which is a direct child of a specific environment node group | Used to Test code with canary nodes and alternate Puppet environments. This group
acts as a gatekeeper, and, when present, permits nodes in the parent
environment node group to temporarily use Puppet environments other than their
normal default environment. This is the only condition where it is possible for an environment node group to have a child group. |
| 5 | PE Infrastructure node group (and its child groups) | These are built-in classification node groups used to manage infrastructure nodes. Don't modify these groups except when following official documentation or support instructions. |
| 6 | Various classification node groups and their children | Classification node groups apply classes and configuration data to nodes. Nodes can belong to multiple classification node groups. Child classification node groups can be used Test and promote a parameter or Test and promote a class. |
Test and promote a parameter
Use an environment-based testing workflow to test and promote a parameter.
Test and promote a class
Use an environment-based testing workflow to test and promote a class.
Test code with canary nodes and alternate Puppet environments
You can test new code using one-time Puppet agent runs on specific canary nodes.
development or test
environment node groups.To enable the canary workflow, create a one-time run exception child group under each environment node group in which you want to test code. This group matches nodes on the fly when you run Puppet with the environment specified.
For example, the following steps create a one-time run exception environment group as a child of the Development environment node group. You can create a similar group for any environment you want to test.
Sample rules for one-time run exception groups
These examples show several ways to configure rules for one-time run exception child groups. Where multiple rules are listed, combine the rules by specifying that nodes must match all rules.
| Testing scenario | Fact | Operator | Value |
|---|---|---|---|
| Permit any node in the parent environment group to use any Puppet environment | agent_specified_environment | ~ | .+ |
| Permit RHEL nodes in the parent environment group to use any Puppet environment | agent_specified_environment | ~ | .+ |
| facts.os.family | = | RedHat | |
| Permit any nodes in the parent environment group to use any Puppet environment except production | agent_specified_environment | ~ | .+ |
| agent_specified_environment | != | production | |
| Permit any nodes in the parent environment group to use any Puppet environment that begins with the prefix "feature_ | agent_specified_environment | ~ | ^feature_.+ |