Installing Puppet agent: Microsoft Windows
Install the Puppet agent so that your master can communicate with your Windows nodes.
Before you begin: If you’re using Puppet with a master-agent configuration, you’ll need a *nix node to act as your Puppet master. Read the pre-install tasks.
-
Download the Windows
puppet-agentpackagePuppet’s Windows packages can be found here. You need the most recent package for your OS’s architecture:
- 64-bit versions of Windows must use
puppet-agent-<VERSION>-x64.msi. - 32-bit versions of Windows must use
puppet-agent-<VERSION>-x86.msi.
Note: Puppet agent will prevent you from running the 32-bit version on a 64-bit Windows system, this functionality was deprecated in Puppet 4, and removed in Puppet 5.
These packages bundle all of Puppet’s prerequisites, so you don’t need to download anything else.
The list of Windows packages might include release candidates, whose filenames have something like
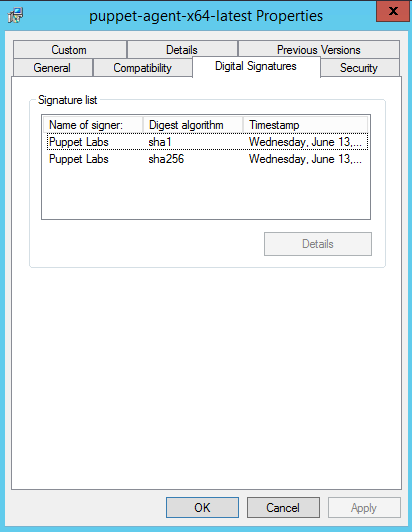
-rc1after the version number. Use these only if you want to test upcoming Puppet versions.Note: Puppet dual-signs
puppet-agentpackages. You might see a warning from your browser saying the signature is corrupt or invalid.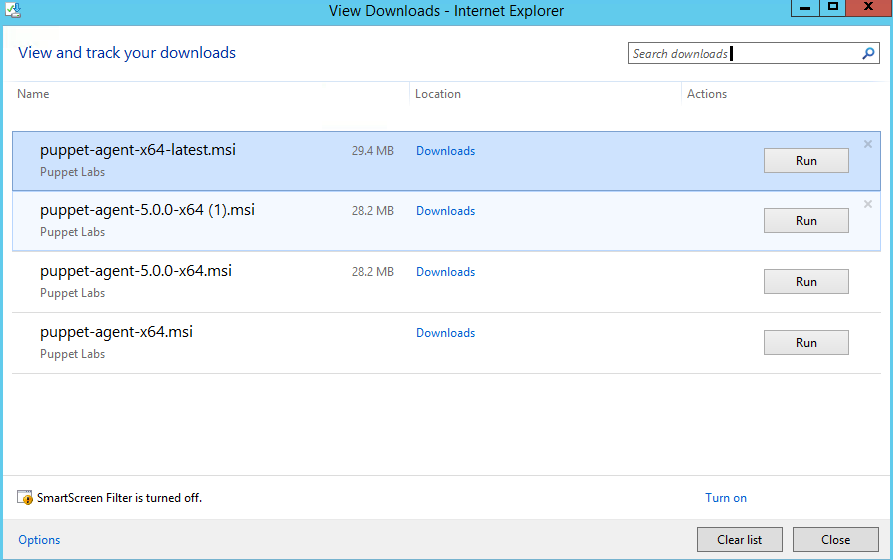
If you want to verify the package is dual-signed, right-click on the MSI, and select Properties. Navigate to the Digital Signatures tab and you should see something similar to:
- 64-bit versions of Windows must use
-
Install Puppet
You can install Puppet with a graphical wizard or on the command line. The command-line installer provides more configuration options.
Graphical installation:
-
Double-click the MSI package you downloaded, and follow the graphical wizard. The installer must be run with elevated privileges. Installing Puppet does not require a system reboot.
-
During installation, Puppet asks you for the hostname of your Puppet master server. This must be a *nix node configured to act as a Puppet master.
For standalone Puppet nodes that won’t connect to a master, use the default hostname (
puppet). You might also want to install on the command line and set the agent startup mode toDisabled.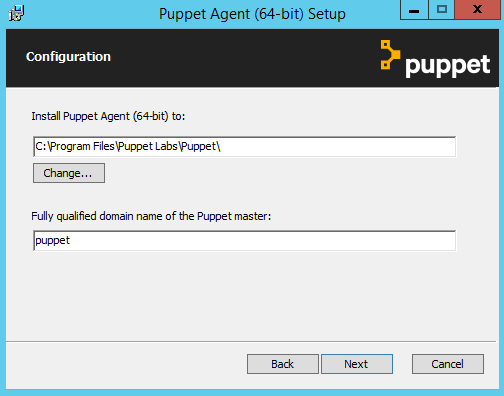
Once the installer finishes, Puppet will be installed, running, and partially configured.
Automated installation:
-
Use the
msiexeccommand to install the Puppet package.msiexec /qn /norestart /i puppet-agent-<VERSION>-x64.msiIf you don’t specify any further options, this is the same as installing graphically with the default Puppet master hostname (
puppet).Optionally, you can specify
/l*v install.txtto log the installation’s progress to a file.You can also set several MSI properties to pre-configure Puppet as you install it. For example:
msiexec /qn /norestart /i puppet-agent-<VERSION>-x64.msi PUPPET_MASTER_SERVER=puppet.example.comSee the MSI Properties section for information about these MSI properties.
Once the installer finishes, Puppet will be installed, running, and partially configured.
MSI properties
These options are only available when installing Puppet on the command line.
| MSI Property | Puppet Setting |
|---|---|
INSTALLDIR |
|
PUPPET_MASTER_SERVER |
server |
PUPPET_CA_SERVER |
ca_server |
PUPPET_AGENT_CERTNAME |
certname |
PUPPET_AGENT_ENVIRONMENT |
environment |
PUPPET_AGENT_STARTUP_MODE |
|
PUPPET_AGENT_ACCOUNT_USER |
|
PUPPET_AGENT_ACCOUNT_PASSWORD |
|
PUPPET_AGENT_ACCOUNT_DOMAIN |
INSTALLDIR
Specifies where Puppet and its dependencies should be installed.
If you installed Puppet into a custom directory and are upgrading from a 32-bit version to a 64-bit version, you must re-specify the
INSTALLDIRoption when upgrading.If you are replacing 64-bit Puppet with a 32-bit version, you should uninstall Puppet before installing the new package. Be sure to re-specify any relevant MSI properties when re-installing.
Puppet’s program directory contains the following subdirectories:
| Directory | Description |
|---|---|
| bin | scripts for running Puppet and Facter |
| facter | Facter source |
| hiera | Hiera source |
| mcollective | MCollective source |
| misc | resources |
| puppet | Puppet source |
| service | code to run puppet agent as a service |
| sys | Ruby and other tools |
Default:
When using the architecture-appropriate installer, Puppet installs into C:\Program Files\Puppet Labs\Puppet.
PUPPET_MASTER_SERVER
The hostname where the Puppet master server can be reached. This sets a value for the server setting in the [main] section of puppet.conf. Default: puppet
Note: If you set a non-default value for this property, the installer replaces any existing value in puppet.conf. Also, the next time you upgrade, the installer re-uses your previous value for this property unless you set a new value on the command line. So if you’ve used this property once, you shouldn’t change the
serversetting directly in puppet.conf; you should re-run the installer and set a new value there instead.
PUPPET_CA_SERVER
The hostname where the CA Puppet master server can be reached, if you are using multiple masters and only one of them is acting as the CA. This sets a value for the ca_server setting in the [main] section of puppet.conf. Default: The value of the PUPPET_MASTER_SERVER property.
Note: If you set a non-default value for this property, the installer replace any existing value in
puppet.conf. Also, the next time you upgrade, the installer re-uses your previous value for this property unless you set a new value on the command line. So if you’ve used this property once, you shouldn’t change theca_serversetting directly inpuppet.conf; you should re-run the installer and set a new value there instead.
PUPPET_AGENT_CERTNAME
The node’s certificate name, and the name it uses when requesting catalogs. This sets a value for the certname setting in the [main] section of puppet.conf. For best compatibility, you should limit the value of certname to only use lowercase letters, numbers, periods, underscores, and dashes. (That is, it should match /\A[a-z0-9._-]+\Z/.) Default: the node’s fully-qualified domain name, as discovered by facter fqdn.
Note: If you set a non-default value for this property, the installer replaces any existing value in
puppet.conf. Also, the next time you upgrade, the installer re-uses your previous value for this property unless you set a new value on the command line. So if you’ve used this property once, you shouldn’t change thecertnamesetting directly inpuppet.conf; you should re-run the installer and set a new value there instead.
PUPPET_AGENT_ENVIRONMENT
The node’s environment. This sets a value for the environment setting in the [main] section of puppet.conf.
Default: production
Note: If you set a non-default value for this property, the installer replaces any existing value in
puppet.conf. Also, the next time you upgrade, the installer re-uses your previous value for this property unless you set a new value on the command line. So if you’ve used this property once, you shouldn’t change theenvironmentsetting directly inpuppet.conf; you should re-run the installer and set a new value there instead.
PUPPET_AGENT_STARTUP_MODE
Whether the Puppet agent service should run (or be allowed to run). Allowed values:
-
Automatic(default) — Puppet agent starts with Windows and stays running in the background. -
Manual— Puppet agent won’t run by default, but can be started in the services console or withnet starton the command line. -
Disabled— Puppet agent is installed but disabled. You must change its startup type in the services console before you can start the service.
PUPPET_AGENT_ACCOUNT_USER
Which Windows user account the Puppet agent service should use. This is important if the Puppet agent needs to access files on UNC shares, since the default LocalSystem account cannot access these network resources.
- This user account must already exist, and can be a local or domain user. (The installer allows domain users even if they haven’t accessed this machine before.)
- If the user isn’t already a local administrator, the installer adds it to the
Administratorsgroup. - The installer also grants the
Logon as Serviceprivilege to the user.
This property should be combined with PUPPET_AGENT_ACCOUNT_PASSWORD and PUPPET_AGENT_ACCOUNT_DOMAIN. For example, to assign the agent to a domain user ExampleCorp\bob, install with:
msiexec /qn /norestart /i puppet-agent-<VERSION>-x64.msi PUPPET_AGENT_ACCOUNT_DOMAIN=ExampleCorp PUPPET_AGENT_ACCOUNT_USER=bob PUPPET_AGENT_ACCOUNT_PASSWORD=password
Default: LocalSystem
PUPPET_AGENT_ACCOUNT_PASSWORD
The password to use for the Puppet agent’s user account. See the notes under PUPPET_AGENT_ACCOUNT_USER.
Default: no value.
PUPPET_AGENT_ACCOUNT_DOMAIN
The domain of the Puppet agent’s user account. See the notes under PUPPET_AGENT_ACCOUNT_USER.
Default: .
Downgrade from 64-bit Puppet to 32-bit Puppet
If you need to replace a 64-bit version of Puppet with a 32-bit version, you must uninstall Puppet before installing the new package.
You can uninstall Puppet through the “Add or Remove Programs” interface or from the command line.
To uninstall Puppet from the command line, you must have the original MSI file or know the ProductCode of the installed MSI:
msiexec /qn /norestart /x puppet-agent-1.3.0-x64.msi
msiexec /qn /norestart /x <PRODUCT CODE>
When you uninstall Puppet, the uninstaller removes Puppet’s program directory, the Puppet Agent services, and all related registry keys. It leaves the $confdir, $codedir, and $vardir intact, including any SSL keys. To completely remove Puppet from the system, manually delete the $confdir, $codedir, and $vardir.
Upgrade from 32-bit Puppet to 64-bit Puppet on Windows
The easiest migration path to upgrade is to compensate for redirection, using the $system32 fact, available in Puppet 3.7.3 and later. This fact automatically compensates for file system redirection. You need to ensure any manifests also use this fact, and that any modules you are using are not affected by redirection. The best way to do this is to check the READMEs for the module.
The installer specifically stores information in different areas of the registry to allow rolling back to the 32bit agent.
For more information, see compensating for redirection.