Blog
April 7, 2026

This tutorial shows how to use GitHub Copilot with the Puppet Model Context Protocol (MCP) server to generate, validate, and refine a Puppet module—even if you’re new to Puppet development.
What You’ll Learn
- How to configure GitHub Copilot with the Puppet MCP server
- How AI agents can use the Puppet Development Kit (PDK) to generate Puppet modules
- How AI agents can use the PDK to validate and iterate on generated Puppet code
The Challenge: Overcoming the Puppet Module Learning Curve
When you start automating infrastructure with Puppet, you might face an initial learning curve. You will begin to learn Puppet syntax, best practices around module structure and Puppet Domain-Specific Language (DSL), and even what tools are available to you.
To help DevOps practitioners get started, Puppet first released an MCP server to accelerate development when using the new Puppet EdgeOps module for working with network devices. Starting with Puppet Enterprise Advanced 2025.7, tools are available to provide even more guidance and information for working with agents on Puppet code in control repos, tasks, and modules. Traditional module development demanded deep domain expertise that teams often lack, but using modern AI-assisted development flows can help you bridge the knowledge gap.
Puppet's MCP server can be used with your favorite Integrated Development Environment (IDE) and code assist agent so that you can describe your requirements in natural language and work with your agent to get validated Puppet code and architecture. This tutorial demonstrates the use of Visual Studio (VS) Code and GitHub Copilot to generate a Puppet module with minimal Puppet expertise, helping you get started faster!
⚠️ Important: AI tools make mistakes, just like people. For this reason, your process should always involve review and testing as part of the end-to-end process. Use these tools to augment yourself and the team, but make those tools earn your trust.
Time to get started!
Back to topTech Stack Overview: VS Code, GitHub Copilot, and Puppet MCP
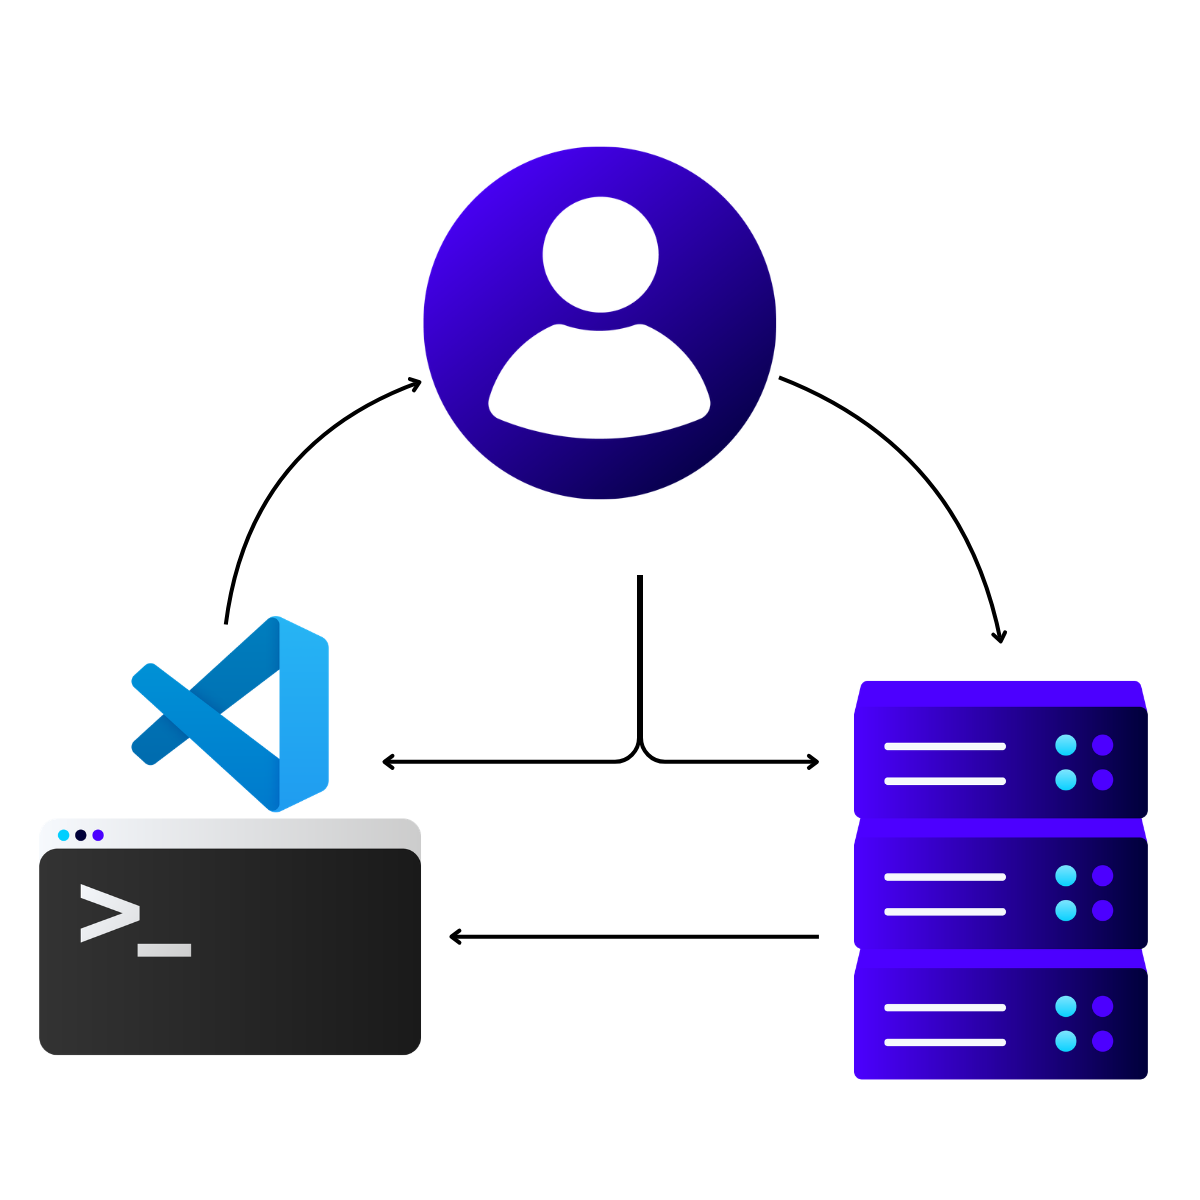
For this tutorial, the Puppet development workflow will combine three key technologies:
- Visual Studio Code: Serves as the IDE where all coding (and code generation) happens.
- GitHub Copilot: Acts as the AI coding assistant that provides intelligent code suggestions and executes autonomous tasks.
- Puppet MCP server: Exposes Puppet-specific intelligence through MCP, enabling GitHub Copilot to better generate Puppet solutions.
The MCP server provides several tools to provide Puppet language guides, information about Puppet environment entities, Puppet documentation, and networking info. This integration eliminates context switching between documentation, terminal windows, and code editors and provides the information required by AI agents to support smooth transitions from one step to the next.
Authentication to the Puppet MCP server happens via Puppet Enterprise (PE) API keys with secure token storage in VS Code. The MCP architecture follows a client-server model where VS Code instantiates client connections to the Puppet MCP server running in your Puppet Enterprise environment.
Back to topPrerequisites and Required Software Installation
This brief tutorial is based on the assumption that you have met several prerequisites. Plan time to go through this checklist before starting:
- Obtain your authentication credentials to download Perforce Puppet applications. The credentials are either your Forge API key or your Puppet Enterprise license ID.
- Install Puppet Enterprise Advanced 2025.7+.
- Enable the Infra Assistant feature on your PE server. You do not have to configure the Infra Assistant OpenAI settings, but the Infra Assistant must be turned on in order for the MCP server to accept requests from your agent.
- Generate a valid Puppet Enterprise API key from the console for a user with the infrastructure_assistant:use permission. (The API key is sometimes called a token.)
- Install Visual Studio Code on your development machine and complete configuration tasks:
- Configure the GitHub Copilot extension in Visual Studio Code.
- Configure GitHub Copilot to use MCP servers in VS Code.
- Ensure that your developer machine has network access to the PE console host.
- Verify that your developer machine trusts the PE console CA certificate.
Tutorial Walkthrough: From Empty Repository to Generated Module
These steps walk through how you can take a completely empty repository to a validated Puppet module by using an AI-assisted flow in Visual Studio with a code assistant. Remember to meet the previously listed prerequisites! The following steps use GitHub Copilot, but if you happen to use a different stack (like Claude Code or Cursor), the process is mostly the same.
Tip: In this tutorial, “agent chat” refers to the GitHub Copilot Agent chat window in Visual Studio Code.
- Using your favorite source control tool, create a blank repository to begin working.
- Clone the repository and open it in Visual Studio Code.
- To support the use of Puppet tools, install GitHub Copilot instructions in your solution. Sample instructions are available on GitHub.
Tip: Some models cannot easily find instructions in subfolders and search only in the root directory. Some models look only for the copilot-instructions.md file. The example provides a README.md and a copilot-instructions.md file that help lead the model toward the custom Puppet instructions file. - Add the Puppet MCP server to your mcp.json file.
- Start the Puppet MCP server, either by clicking Start in your mcp.json file or through the MCP Servers – Installed list in the Extensions view.
- Open an agent chat window for GitHub Copilot.
- Run a prompt to generate a new module. For example: “I want to create a new Puppet module to automate the provisioning of new AWS VMs. Please follow best practices for Puppet module creation.”
Note that this is a simple prompt example. To follow context engineering best practices, you would provide much more detail to get your desired output. For tutorial purposes, the prompt is intentionally lightweight. By using a simple prompt, you can recognize the extra context and benefits provided by Puppet tools to accelerate your progress.
Installing Puppet Development Kit (PDK)
At this point, your agent should be running and attempting to solve the problem. The agent will quickly detect the need for additional information from the Puppet MCP server. In addition, the agent will determine that the Puppet Development Kit (PDK) must be used to create modules. In my model testing, the GitHub Copilot agent undertook the following tasks, which required minimal input from the user:
- Processed the provided Puppet instructions and determined that the Puppet MCP server should be connected to retrieve guidelines.
- Attempted to connect to the Puppet MCP server for the get_puppet_guide tool and augmented the context with information from the Puppet MCP server.
- Recognized that the PDK is required and attempted to check whether PDK was installed (by running pdk --version).
If PDK was not detected, attempted to fetch the PDK installation instructions.
Tip: The agent may use different URLs to search for the PDK installation instructions. Eventually, the agent will find the correct installation instructions for the operating system.
- After the agent discovered the installation instructions, the agent determined that authentication credentials are required to download the software. At this point, the user would be prompted for Forge credentials or Puppet Enterprise credentials. At the prompt, you will specify the type of credentials. For example: “Here is my license ID: abcdefghizjklmnopzrstuvwxyz1”. This sample prompt informs the agent to use a Puppet Enterprise license ID, instead of a Forge API key, as the authentication method.
- Submit the prompt and the agent will begin to download and install the PDK.
The agent typically installs the PDK as part of its setup routine. In practice, the agent might run incorrect commands or fail to use elevated privileges on the first attempt. When that happens, allow the agent to iterate until the installation succeeds.
💡 Tip: This is a huge boost for new users because the agent can search for instructions and quickly iterate through installation failures, while you focus on reviewing the results.
After the agent successfully completes the PDK download and installation on your behalf, the agent continues with module generation.
Back to topGenerating the Module
With the PDK installed, it’s time to create the first steps of a module that will accomplish your goals. Only minimal context is provided in the tutorial example for provisioning new AWS VMs. The models will attempt to create the functionality you require based on their training data, the context from the Puppet MCP server, and the context you provide. The better your prompting, the more accurate the output will be. For this tutorial, however, assume that you are not trying to generate the module in one step and will follow up with further prompting to refine the module. During this tutorial step, the agent will generate the basics of the module.
At this stage, GitHub Copilot typically performs the following actions without requiring additional prompts:
- After completing installation, validates the installation by running pdk --version.
- If successful, creates a module with a PDK command like pdk new module aws_provisioning --skip-interview.
- After the PDK module creation logic completes processing, creates profile classes for AWS VM provisioning. This command might be pdk new class aws_provisioning or similar.
- Creates additional supporting classes. In my testing, the agent ran these additional commands:
- pdk new class aws_provisioning::config
- pdk new class aws_provisioning::instance
- After the basic structure of the classes is in place, begins implementing Puppet code for the classes. The actions resemble typical code generation steps, creating and editing a variety of files and patching them with new implementation logic.
- When the initial code generation is completed on top of the PDK skeleton implementations, updates documentation such as the metadata.json file and the README file to match the needs of the generated code.
When documentation updates are completed, a typical agent might stop without validating further. However, by setting the context for the agent with knowledge of PDK and its capabilities as well as the best practices from the Puppet MCP server, the agent knows that validation of modules is an important next step.
Back to topValidating the Module
PDK supports validation of a module to ensure that it meets specific standards. Even with the best practices and instructions that were provided to the agent, along with its training, agents can make mistakes. With validation, you can catch some of these mistakes up front. Augmenting with tools is a key strategy for agentic workflows. Using the agent as an automation process to leverage the tools you have is a great way to take advantage of more deterministic capabilities along with the non-deterministic nature of the agentic automation.
- For validation, the agent should attempt to use the PDK: pdk validate
- PDK should find issues, even if they are only indentation issues in YAML files. The agent should then attempt to correct the issues with code assist using the output of the PDK validation.
- When the patch edits are complete, the agent should run PDK validation again (pdk validate).
If more issues are found, the agent should circle back and try to resolve them, looping until no more issues are found, but typically the first run of validation should find all issues.
You can now continue your own testing and building out the module with a solid base that follows Puppet best practices! This workflow compresses the traditional learning curve and gets you to the interesting bits of your development much faster.
Back to topKey Benefits of Agent-Assisted Module Creation
This AI-assisted approach offers several key advantages over manual development:
- Agent-led requirements detection and installation help you get started so that your system achieves a correct state.
- Autonomous error detection and correction reduce debugging time significantly.
- The agent's ability to reference the Puppet MCP server and official Puppet documentation helps to ensure that generated code follows best practices and coding standards.
- Integration with PDK tooling provides deterministic automation and continuous quality checks throughout the development process.
- Structured instruction files create a consistent and repeatable development experience across different projects and team members.
By building your AI-assisted flow on top of solid DevOps tools and practices, you’ll be equipped to avoid the typical challenges faced by generic coding models.
Back to top“DevOps is not dying. It is becoming the economic and operational foundation for AI at scale.
The data shows the same pattern across every domain: AI succeeds when delivery systems are standardized, centralized, automated, and measurable. Where those foundations are weak, AI magnifies existing gaps in coordination, governance, auditability, cost, and outcomes.”
- State of DevOps Report 2026
Challenges and Solutions in AI-Assisted Puppet Development
You might encounter a few common challenges when using AI agents for Puppet module generation:
- According to a recent evaluation by Vercel, coding agents ignore available skills in 56% of cases, choosing not to invoke skills even when relevant documentation exists. The solution involves using instruction files that force context loading rather than relying on agent decisions. In the evaluation, Vercel found that directly embedding a compressed 8 KB docs index into an AGENTS.md file helped coding agents achieve 100% pass rates compared to 79% with skills combined with explicit instructions. In my own tests with GitHub Copilot, references from the README.md file to other instruction files helped the agent, with less sophisticated models, to find the correct instructions and load them.
- Agents sometimes refuse to use PDK or read proper installation instructions, requiring iterative prompt refinement. The solution involves adding explicit installation commands, troubleshooting steps, and URL references to your copilot-instructions.md file. Ensure that you follow best practices for instructions files to keep them lean. Getting GitHub Copilot to consistently read instruction files requires understanding that passive context (always-loaded files) outperforms active retrieval (on-demand skills). Instruction files should be concise (fewer than 1,000 lines), structured with headings and bullet points, and use imperative rules rather than long paragraphs.
- AI agents can get stuck in validation and fixing loops. For linting and validation errors that agents struggle to fix, adding error-specific guidance to instruction files helps GitHub Copilot learn from mistakes. The goal is to eliminate decision points by providing persistent context rather than making agents decide when to look up information.
Table 1: Common challenges in AI-assisted Puppet module development and recommended solutions
Challenge | Impact | Solution |
| Agents ignore MCP tools (56% of cases) | Skills documentation not invoked when needed | Use .github/copilot-instructions.md for passive context loading (achieves 100% pass rate versus 79% with on-demand skills). |
| PDK installation issues | Agents fail to use PDK or read installation instructions | Add explicit installation commands and troubleshooting steps to copilot-instructions.md. |
| Inconsistent reading of instruction files | Agent decisions create unpredictable behavior | Provide persistent context (always-loaded files) rather than relying on agent retrieval decisions. |
| Incorrect Puppet code or missing namespaces or invalid spacing | Generated configurations fail validation | Include specific vendor configuration examples in instruction files and use PDK validation for testing modules. |
| Validation errors agents can't fix | Repeated mistakes across generations | Document error-specific guidance in instruction files so agents learn from past failures. |
| File structure guidelines | Keep instruction files concise (fewer than 1,000 lines) with clear structure | Use headings, bullet points, and imperative rules instead of long paragraphs. |
Should You Use Agent Skills or Instructions?
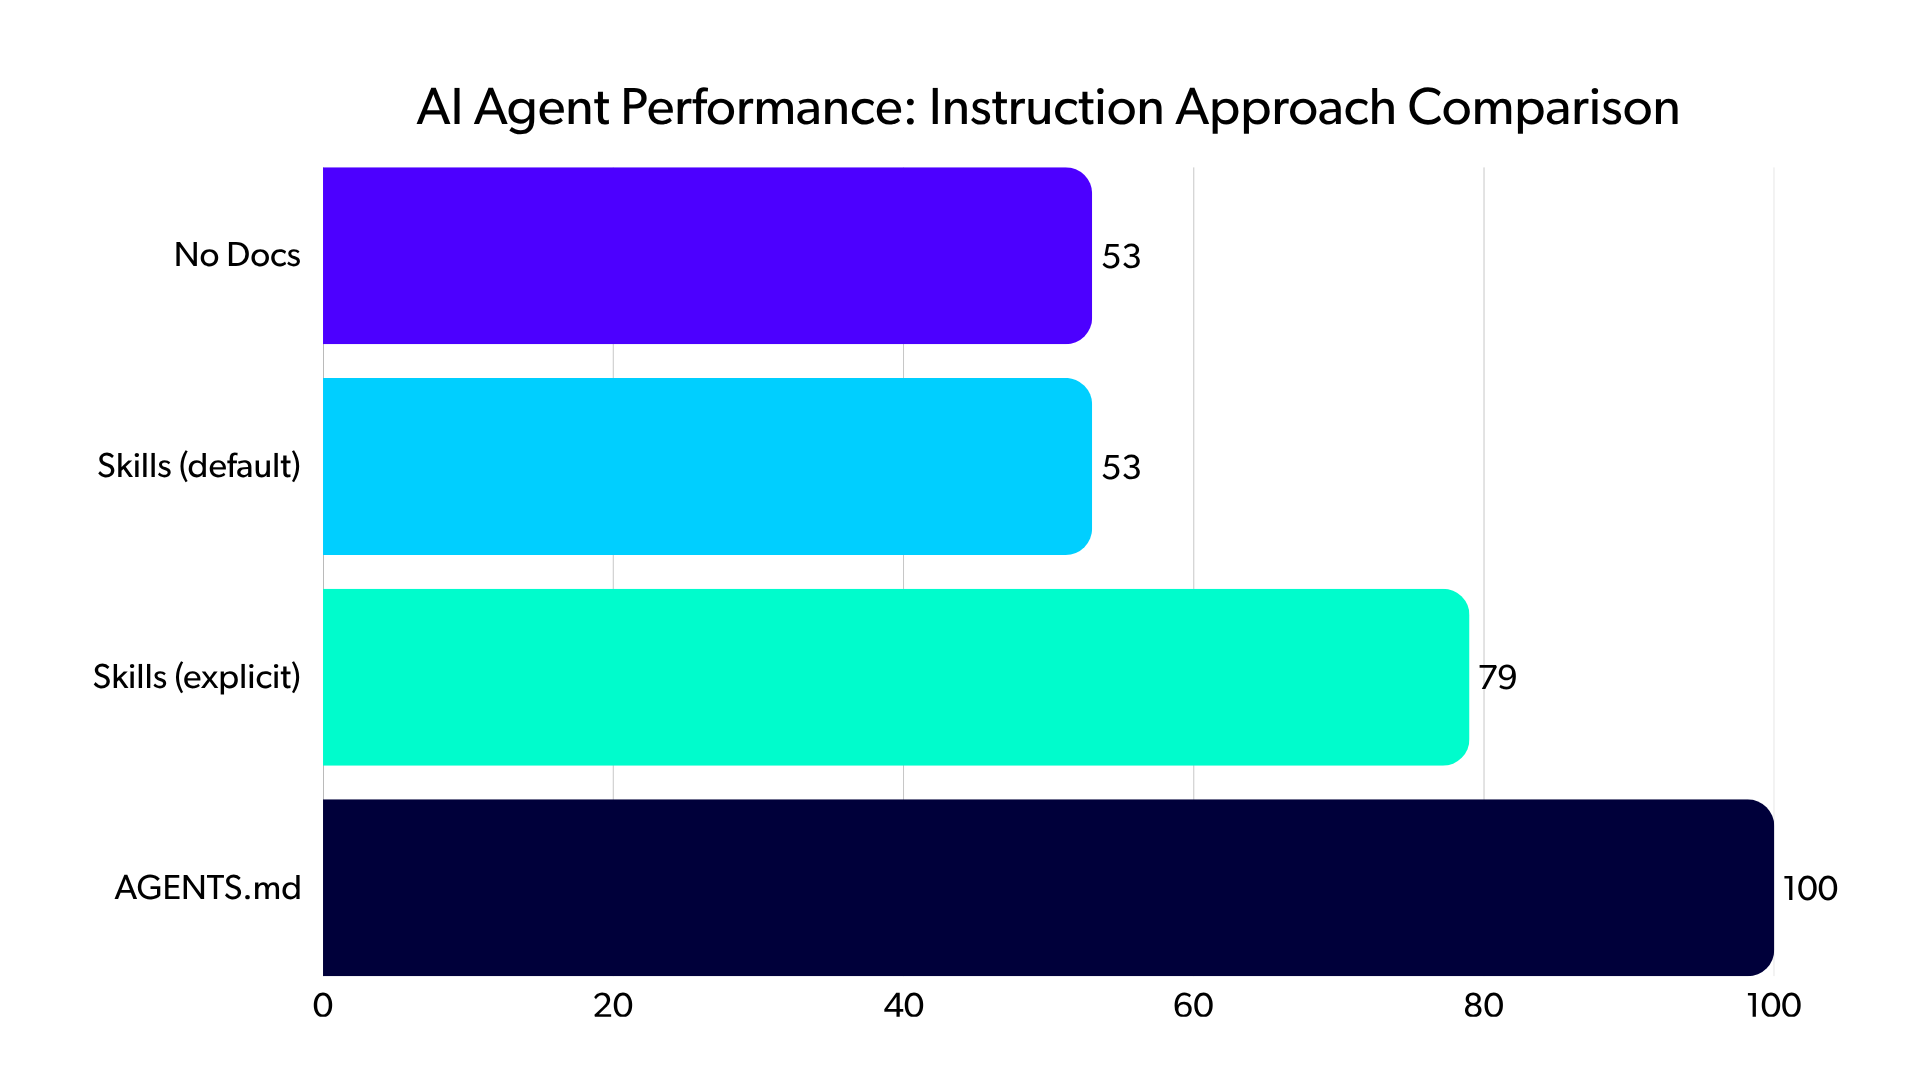
Vercel's research on AI agent instruction approaches provides compelling evidence to show why instruction files are essential for effective AI-assisted development. Their evaluation tested Next.js 16 API generation using four configurations:
- No documentation: 53% pass rate
- Skills with default behavior: 53% pass rate, same as no documentation
- Skills with explicit trigger instructions: 79% pass rate
- A compressed 8 KB docs index in AGENTS.md: 100% pass rate
The static markdown file outperformed sophisticated retrieval systems because the file eliminated decision points where agents must choose whether to invoke tools. In 56% of eval cases, skills were never invoked despite being available, producing no improvement over the baseline.
Although these findings were focused on web development frameworks like Next.js, similar issues occur with agents across language frameworks and IDEs. For Puppet development, my testing found that combining instructions, PDK tooling, and the Puppet MCP server gave agents the best chance to have the correct context information.
AI-assisted development is still evolving but is expected to become an important part of many DevOps team processes. The Model Context Protocol is establishing itself as an enterprise-wide standard enabling vendor interoperability, with companies like Figma, Notion, Linear, Atlassian, and MongoDB building MCP servers that work seamlessly together.
For infrastructure-as-code specifically, the shift toward “vibe coding” is opening up the opportunity for developers to express intentions in natural language rather than memorizing command-line syntax or the specifics of the Puppet Desired State Language (DSL). Given a solid base of DevOps tools across the lifecycle, from development to testing to operations, coding assistants are well positioned to take advantage of these tools, thus unlocking opportunities for more practitioners to achieve greater efficiency across the entire workflow.
Back to topReferences
Check out the following sources, some of which were referenced in the document, and some of which provide a deeper dive if this topic is of interest to you!
- Sample instructions for GitHub Copilot and Puppet MCP server (github.com/jst-cyr)
- Installing Puppet Enterprise (PE) (help.puppet.com)
- Infra Assistant: code assist (help.puppet.com)
- Infra Assistant: Enable the Infra Assistant (help.puppet.com)
- Infra Assistant - code assist: Available MCP tools (help.puppet.com)
- Infra Assistant - code assist: Configuring your client to use the MCP server (help.puppet.com)
- Infra Assistant - code assist: Add the Puppet MCP server (help.puppet.com)
- SAML authentication: Generate a token in the console (help.puppet.com)
- View your license details | Puppet Enterprise (help.puppet.com)
- Get the Puppet CA certificate chain in Puppet Enterprise (portal.perforce.com)
- Build Tasks for Network Devices Faster with Code Assistance and Puppet Edge (puppet.com)
- The State of DevOps Report 2026 (perforce.com)
- AGENTS.md outperforms skills in our agent evals (vercel.com)
- GitHub Copilot: Use MCP servers in VS Code (code.visualstudio.com)
- GitHub Copilot in VS Code (code.visualstudio.com)
- Using custom instructions to unlock the power of Copilot code review (docs.github.com)
- Bridging the Gap: A Deep Dive into the Model Context Protocol (MCP) (dev.to)