Blog
October 23, 2025
Build Tasks for Network Devices Faster with Code Assistance and Puppet Edge

Infrastructure Automation,
Configuration Management,
How to & Use Cases
Whether you are an all-in vibe coder or AI skeptic, you probably know that most software developers are now incorporating AI into their day-to-day process. Google Cloud’s 2025 DORA report saw “the majority of survey respondents (90%) use AI as part of their work.” The 2025 StackOverflow Developer Survey showed that “84% of respondents are using or planning to use AI tools this year.” With AI-powered agentic code assistants, developers can shift up in their process, focusing on requirements and goals and spending less time on syntax and coding, but trust still remains a major issue. The challenge is always about getting accurate output with fewer hallucinations and more one-shot results. That is the problem that Puppet wants to solve for Puppet Edge task developers.
With Puppet Infra Assistant and Puppet Edge, developers can now use an Integrated Development Environment (IDE), like Visual Studio Code, to get real-time help building the Puppet Edge task metadata and Ruby code files that are required to manage network devices. Your IDE’s code assistant, like GitHub Copilot, can now connect to Puppet’s new Model Context Protocol (MCP) server hosted on your Puppet Enterprise server. Enabling this integration, provides intelligent suggestions and validation based on your specific device information, the EdgeOps module documentation, and some Perforce Puppet special sauce to help you arrive at the most accurate generated results possible!
Back to topWhy Code Assistance?
Automating network device configuration changes across many types of devices can pose challenges. Writing Puppet Edge tasks to build out the correct YANG configuration for network devices is complex, especially if you are not familiar with YANG (the Yet Another Next Generation data modeling language). Even seasoned network engineers struggle with the nuances of vendor-specific models, XML namespaces, and the intricate relationships between configuration elements. A single mistake, like omitting a required namespace or misidentifying a key, can cause a configuration to fail silently or be rejected by the device.
This complexity is amplified in multi-vendor environments where teams must navigate different YANG models for Cisco, Juniper Networks, Arista Networks, and others. While standardized models such as OpenConfig help, they still require deep domain knowledge to use effectively.
For DevOps practitioners and developers like yourself who are in charge of infrastructure automation, this challenge presents a steep learning curve. You want to build valid configurations quickly but often must do so without being an expert in network protocols or device-specific quirks.
That’s where Puppet Edge and Puppet Infra Assistant come in.
Tutorial: Code Assistance via MCP
Puppet Edge introduces a developer-friendly workflow that integrates directly into your IDE, such as Visual Studio (VS) Code, and leverages natural language prompts to help you build valid Puppet Edge tasks. The following tutorial walks you through generating a task in VS Code with the help of the Puppet Edge MCP server.
ℹ️ Prerequisites:
- The Puppet Enterprise server is running with Infra Assistant and the MCP server enabled.
- 🔐 The MCP server is an opt-in feature, ensuring that security-conscious organizations retain full control over data flow and feature activation. To take full advantage of code assistance, opt in to Puppet Infra Assistant and then opt in to the MCP server.
- As a developer, you must have access to the MCP endpoint. The docs spell out the details but, in short, you’ll require these:
- An API key to authenticate to the server
- A Puppet Enterprise server certificate, which must be in your trusted certs list
- Permission for your user to use Infra Assistant
- Permission for your user to run EdgeOps tasks
Step-by-Step Instructions
- Add the MCP server in the IDE: First, configure the IDE to register the Puppet Enterprise MCP server. In VS Code, you will store the MCP server configuration in your mcp.json file. You have multiple options for adding an MCP server, but I found using the command palette to be my preferred method:
- Access the command palette by typing a greater than sign (>) into the search bar at the top of VS Code.
- Type mcp to find the command named “MCP:Add Server…”
- When prompted, choose the HTTP option as you will be connecting to a remote MCP instance.
- Enter the URL of your Puppet Enterprise server, appending /mcp to connect to your MCP instance. Use the following structure for the URL: https://myserver.mydomain.com/mcp
- When prompted, specify the Server ID. The Server ID will be stored in your mcp.json file and will be used to identify this specific MCP server in your list of configured MCP servers.
- When prompted for the sharing scope of this MCP server, choose either Workspace or Global, depending on your organization’s requirements.
When prompted for the sharing scope of this MCP server, choose either Workspace or Global, depending on your organization’s requirements.
Your mcp.json file now contains the new server definition.
{
  "servers": {
    "puppet-dev-mcp": {
      "url": "https://myserver.mydomain.com/mcp",
      "type": "http"
    }
  },
  "inputs": []
}
- Add authentication headers: VS Code will not prompt you for authentication headers when you initially add the MCP Server, so you can add the headers now. The preferred practice is to use an API key to authenticate to your Puppet Enterprise server. Take the following actions:
Create an input definition that will prompt the user for their API key. In the mcp.json file, add a block that is similar to the following example, specifying your own id and description:
  "inputs": [
    {
      "type": "promptString",
      "id": "pe-pat",
      "description": "PE API Key",
      "password": true
    }
  ]
Add a headers property to your MCP definition referencing your API key input. Your MCP server definition should look something like this:
"servers": {
  "puppet-dev-mcp": {
    "url": "https://myserver.mydomain.com/mcp",
    "type": "http",
    "headers": {
      "X-Authentication": "${input:pe-pat}"
    }
  }
},
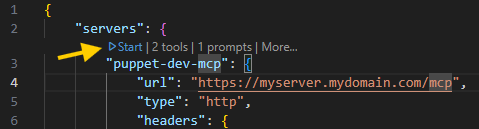
- Start the MCP server: Start the server so that it can begin receiving requests. In VS Code, you can start the server from the mcp.json file or from the Agent chat area. In your mcp.json file, click the ▶️Start link above the name of your MCP server:
Provide the API key: When you launch the MCP server, the input bar at the top of the VS Code prompts you for any inputs defined for your server. In this case, you are prompted for your API key. Enter the API key value for connecting to you Puppet Enterprise server. The value is then encrypted and saved in your workspace. When you launch your MCP server in the future, you will not have to provide this value.

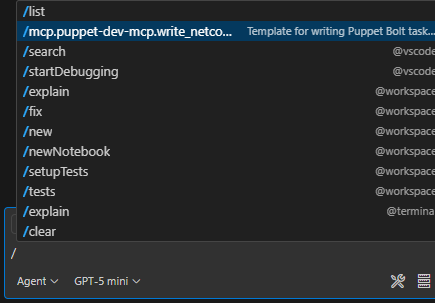
Choose the Puppet write_netconf_task command: In VS Code, you can type a forward slash (/) into your agent chat to load the command options and choose the Puppet EdgeOps MCP command. The command is named based on the server ID that you assigned to your MCP server. In this example, the name is /mcp.puppet-dev-mcp.write_netconf_task:
Describe the change you want to make to your network device. The input bar at the top of the VS Code prompts you for a natural language description of the planned change. In this example, the goal is to configure the NTP servers on a router. Type enable and manage the ntp timeserver:

(Optional) Specify the target device. Because many devices have specific requirements for the format of configuration changes, you can help to avoid issues by specifying the hostname of the device that you plan to change. For example, if you have a router named switch.us-west-1 in your Puppet inventory, you would type switch.us-west-1:

Review the prompt: The Puppet MCP server generates a prompt template for your specified change and target device, including instructions on which tools should be invoked by your coding agent. This feature accelerates your prompt eng neering by providing specific context and instructions.
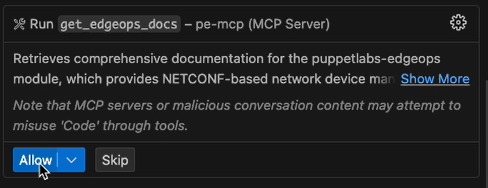
# Write a NETCONF Task for puppetlabs-edgeops

## Task Objective

enable and manage the ntp timeservers

## Target Devices

Switch-us-west-1

## Instructions

Create a Puppet Bolt task for the **puppetlabs-edgeops** module to accomplish the objective above.

### Step 1: Retrieve Module Documentation

Call the `get_edgeops_docs` tool to get comprehensive documentation for the puppetlabs-edgeops module:

```
get_edgeops_docs()
```

This provides everything you need:

- Task structure and session management patterns
- Available built-in tasks and their parameters
- OpenConfig YANG model examples
- Error handling and sensitive data management
- Best practices and usage examples

### Step 2: Check Device Capabilities

If specific target devices are provided, use the `get_device_info` tool to understand what YANG models they support.

**Step 2a: List available schemas**
```
get_device_info(
  targets: ["<device_name>"]
)
```

This returns a list of all available schemas and their identifiers (e.g., 'ietf-interfaces@2014-05-08').

**Step 2b: Get specific schema content** (if needed)
```
get_device_info(
  targets: ["<device_name>"],
  identifiers: ["<schema_name_without_version>", "..."]
)
```

This fetches the full YANG schema content for the specified identifiers.
**Important:** Use identifier names WITHOUT the version (e.g., use "ietf-interfaces" not "ietf-interfaces@2014-05-08").

Note: If no specific targets are provided, use OpenConfig models as the vendor-neutral default.

### Step 3: Implement the Task

Based on the documentation from `get_edgeops_docs` and any device-specific information:

1. **Create the task files** following the structure shown in the documentation. Look to see if you are already
   within a puppet module directory
2. **Use the Session wrapper pattern** from the examples
3. **Prefer OpenConfig models** for vendor neutrality
4. **Follow the best practices** outlined in the documentation

The documentation includes:

- Complete task implementation examples
- Session management patterns
- Parameter validation approaches
- Error handling strategies
- Testing recommendations

### Deliverables

Provide:

1. **Task metadata file** (`.json`) with parameter definitions
2. **Task implementation** (`.rb`) using the session wrapper pattern
3. **Usage examples** showing how to run the task
4. **Optional Bolt plan** if orchestration across multiple devices is needed

Remember: All patterns, examples, and best practices are provided by `get_edgeops_docs` - follow them closely for
consistency with the puppetlabs-edgeops module.
Run the EdgeOps docs tool: Your agent executes the prompt in your VS Code Agent panel. The instructions in the prompt include a request for extra context from the Puppet EdgeOps module documentation. This extra content provides additional information about the built-in tasks in the EdgeOps, instructions for writing task code, NETCONF and YANG information, as well as troubleshooting and best practices to improve the accuracy of the code generation. The get_edgeop_docs tool starts to run after you click Allow:
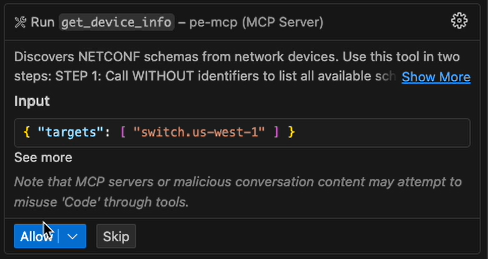
Run the EdgeOps Device Info tool: After the docs information is retrieved, your agent prompts you to run the get_device_info tool. This tool uses the EdgeOps module to connect to your device over NETCONF and gets the details about your specific device to provide more context for code generation. The get_device_info tool runs only if you specify a network device in the prompts and click Allow:
Your GitHub Copilot now generates two files for your EdgeOps task: a JSON (.json) task definition file and a Ruby (.rb).
manage_ntp.json Download from GitHub
{
  "description": "Enable and manage NTP timeservers using OpenConfig on a NETCONF device.",
  "input_method": "stdin",
  "files": [
    "edgeops/files/task_helper.rb",
    "edgeops/lib/puppet_x/puppetlabs/netconf/client.rb",
    "edgeops/lib/puppet_x/puppetlabs/netconf/session.rb",
    "edgeops/lib/puppet_x/puppetlabs/netconf/redactor.rb"
  ],
  "remote": false,
  "parameters": {
    "servers": {
      "description": "List of NTP server IPs or hostnames to configure.",
      "type": "Array[String]"
    },
    "enabled": {
      "description": "Enable or disable NTP globally.",
      "type": "Boolean",
      "default": true
    },
    "prefer": {
      "description": "Preferred NTP server (optional).",
      "type": "Optional[String]"
    }
  }
}
manage_ntp.rb Download from GitHub
#!/usr/bin/env ruby
# frozen_string_literal: true
require_relative '../../edgeops/files/task_helper.rb'
require 'puppet_x/puppetlabs/netconf/session'
require 'json'
result = PuppetX::Puppetlabs::Netconf::Session.with_session do |session|
servers = session.task_params['servers']
enabled = session.task_params.fetch('enabled', true)
prefer = session.task_params['prefer']
unless servers && servers.is_a?(Array) && !servers.empty?
raise "Missing or invalid required parameter 'servers'"
end
session.logger.info("Configuring NTP: enabled=#{enabled}, servers=#{servers.join(', ')}")
# Build OpenConfig NTP configuration XML (strictly matching OpenConfig YANG)
servers_xml = servers.map do |srv|
<<~XML
<server>
<address>#{srv}</address>
<config>
<address>#{srv}</address>
#{prefer == srv ? '<prefer>true</prefer>' : ''}
</config>
</server>
XML
end.join
config = <<~XML
<system xmlns="http://openconfig.net/yang/system">
<ntp>
<config>
<enabled>#{enabled}</enabled>
</config>
<servers>
#{servers_xml}
</servers>
</ntp>
</system>
XML
session.edit_config(config)
session.logger.info("NTP configuration applied to candidate datastore")
session.commit
session.logger.info("NTP configuration committed successfully")
session.report_result({
'status' => 'success',
'enabled' => enabled,
'servers' => servers,
'prefer' => prefer,
'message' => "NTP configuration applied successfully"
})
end
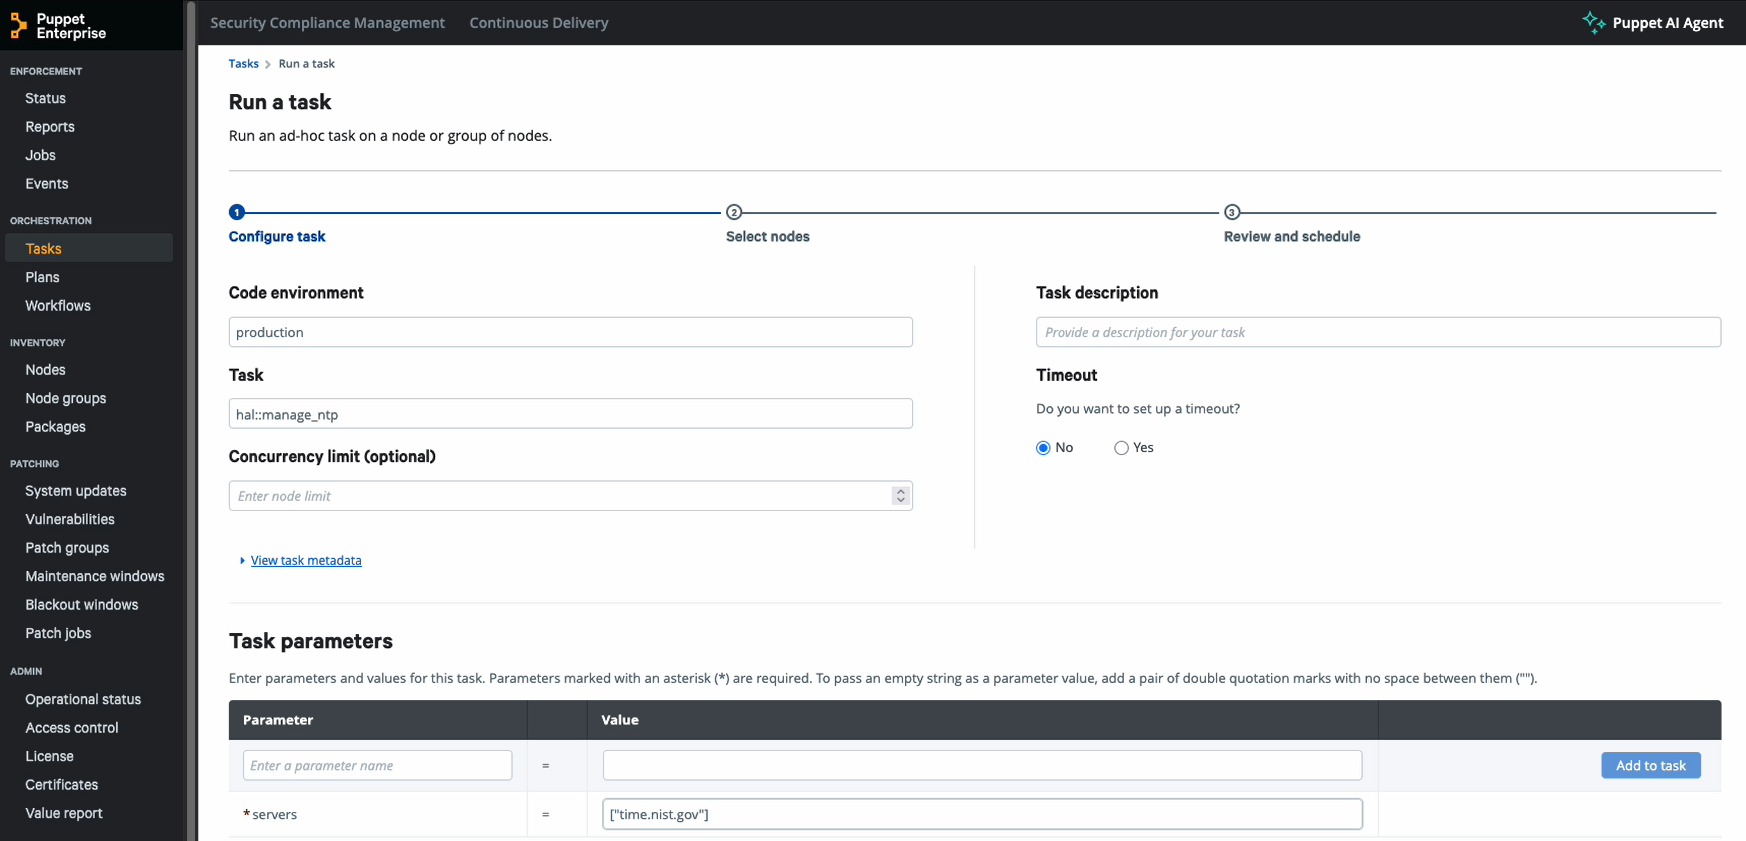
puts result.to_json✅ You can now review, test, and finalize your EdgeOps task! This task can then be deployed and run through your Puppet Enterprise installation, using the EdgeOps module to directly update your network device and save the results to Puppet Enterprise for centralized logging.
Example Scenarios
To further explore the capabilities of Infra Assistant, try prompting the following task objectives while connected to the MCP server so you can generate tasks for your device:
- "Configure a new VLAN” (example output: JSON and RB)
- "Update an admin user password" (example output: JSON and RB)
- "Create a user and SSH key" (example output: JSON and RB)
- "Enable an SSH public key" (examply output: JSON and RB)
- "Remove a user" (example output: JSON and RB)
These sample scenarios show how to centrally manage your network device automation by leveraging the Puppet Edge MCP server with your code assistant, without having to learn the specific details of each device or having to access a vast library of examples to work from. You can generate exactly what you require from your own development environment and build your own library, specific to your devices and policies.
Back to topIs My IDE Allowing External Systems to Connect to My Network Devices?
Puppet Edge uses an architecture that ensures that your IDE and coding agent never expose your network device connections directly to external systems. Your IDE invokes tools that speak to the Puppet EdgeOps tools hosted in your Puppet Enterprise server. Your IDE also connects to the devices on your network, but only context information required for improving task code generation is ever sent to your external LLM agent.
To understand which systems speak to each other during the flow, see the following diagram:
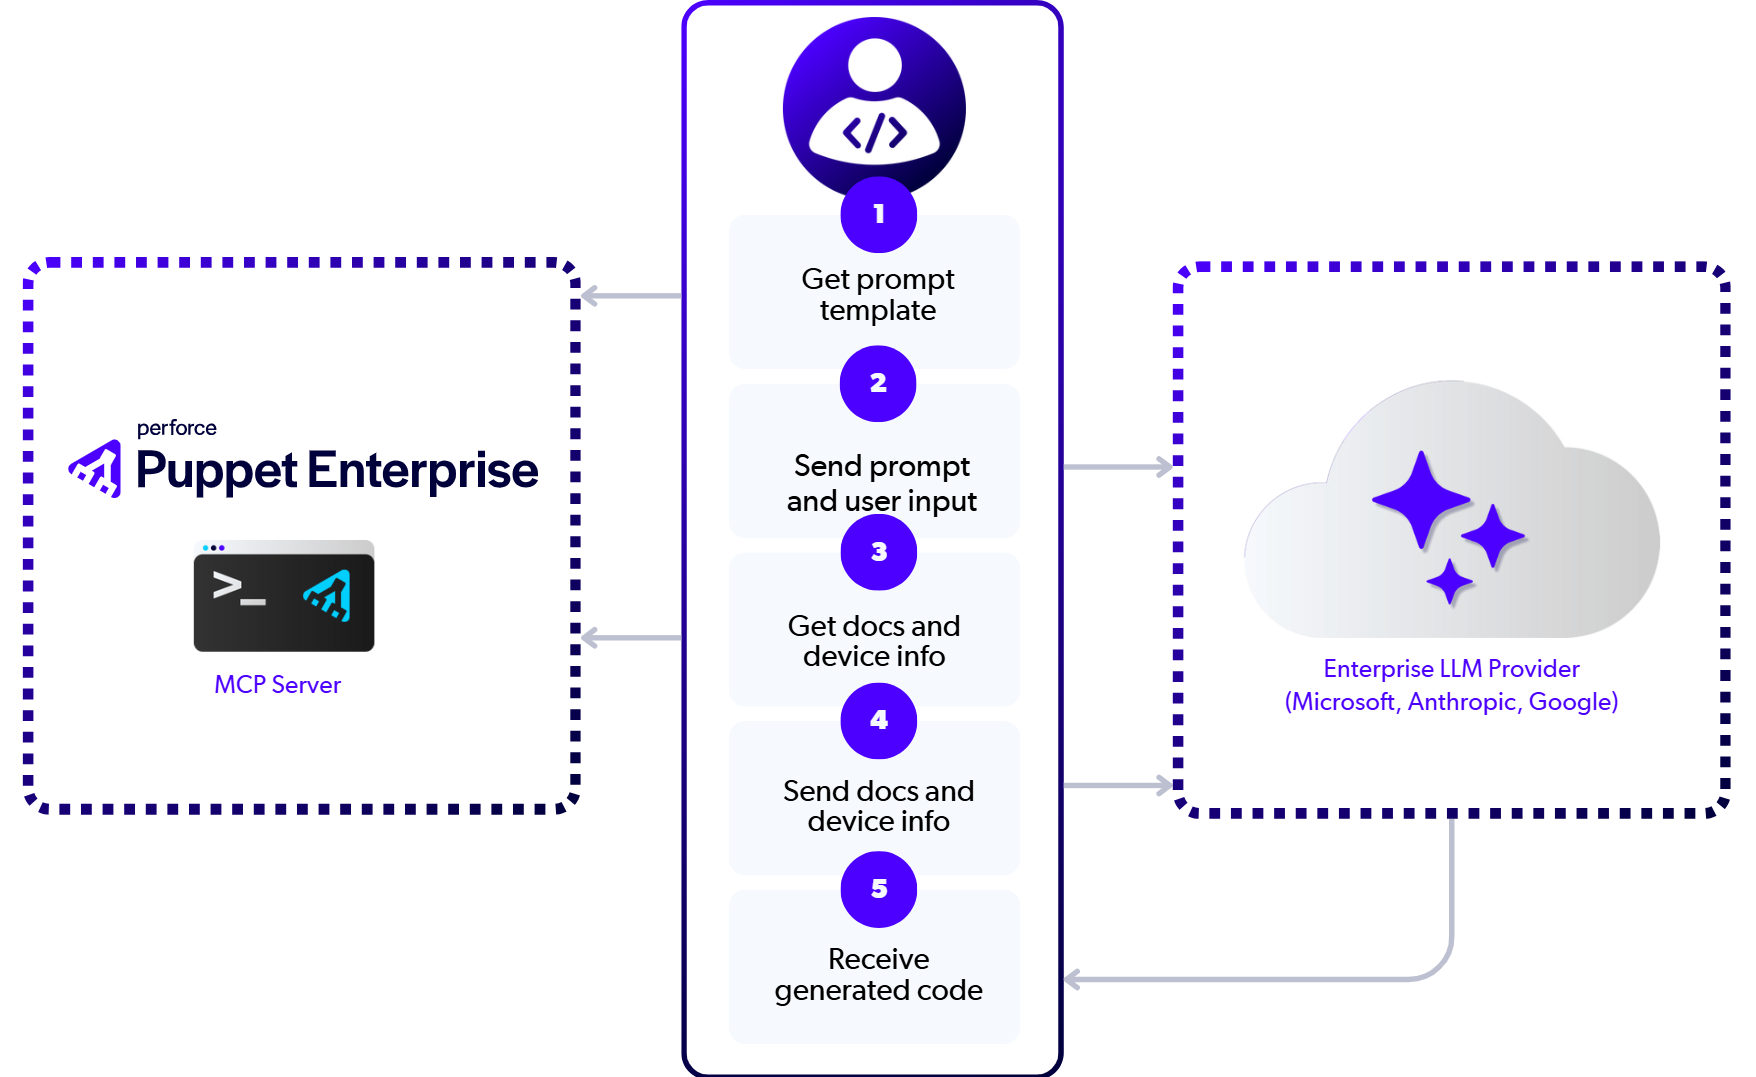
Note the following important aspects of the communication flow:
- The external LLM provider never communicates with the Puppet Enterprise server directly. The LLM provider communicates only with the developer’s IDE/coding assistant.
- The developer’s workstation communicates with the external LLM provider (such as Anthropic, OpenAI, Microsoft, or Google) to ask the agent to process the prompt information, determine next steps, and finally generate the EdgeOps task files.
- MCP requests stay completely within your network by communicating with the Puppet Enterprise server. This process includes getting the prompt template as well as running tools to get documentation and device information.
- While generating an EdgeOps task, the external LLM provider receives the following information:
- Prompt template, including the requested action to take and the target device hostname
- Documentation from the MCP server for best practices, task patterns, and examples
- The device information containing the YANG models list and the full YANG schema content.
What’s Next?
Puppet is just getting started with MCP and code assistance with the goal of providing more helpful tools like this in the future! Keep an eye out for new capabilities coming to Puppet MCP servers and Puppet Infra Assistant to make infrastructure automation more accessible to your entire team.
Want to learn more right now? Check out these official docs and other resources to help you get started:
- Running Ansible Playbooks from Puppet Edge (puppet.com)
- Automating Network Devices with NETCONF and YANG in Puppet Edge (puppet.com)
- Expanding Your Infrastructure Automation Across the Lifecycle Using Puppet Edge (puppet.com)
- Packaging Operations Runbooks with Puppet Edge Workflows (puppet.com)
- Infra Assistant: code assist (help.puppet.com)
- Enabling the MCP server (help.puppet.com)
- Configuring your client to use the MCP server (help.puppet.com)
- Adding an MCP server (help.puppet.com)
- Use MCP servers in VS Code (code.visualstudio.com)
- Puppet EdgeOps example tasks (github.com)
- Puppet Edge official product page (puppet.com)
- Getting Started with Puppet Infra Assistant: A Complete Guide (puppet.com)