Blog
October 16, 2025
Automating Network Devices with NETCONF and YANG in Puppet Edge

Infrastructure Automation,
Configuration Management,
How to & Use Cases
Infrastructure teams manage not only servers and cloud resources, but also complex network environments. Routers, switches, and firewalls…often from multiple vendors with many models and versions. The devices require a consistent configuration and strict compliance enforcement to meet enterprise requirements. Historically, network management has been a fragmented process, relying on vendor-specific CLI commands or SNMP, which is limited to monitoring and lacks transactional integrity, and happens outside of centralized auditing and inventory systems.
Puppet Edge brings your network device management alongside your existing Puppet infrastructure inventory. This unified approach simplifies operations, reduces tool sprawl, and enables consistent automation across your entire environment. For example, you can take advantage of the native support provided by Puppet Edge for the NETCONF protocol and YANG models.
Back to top
Why NETCONF and YANG?
To address the limitations of CLI and legacy protocols like SNMP, the Internet Engineering Task Force (IETF) introduced NETCONF in the mid-2000s. YANG followed in 2010, with a significant update in 2016. These have become the industry standard for working with network devices:
- YANG (Yet Another Next Generation) is a vendor-neutral data modeling language that defines the structure, relationships, and validation rules for network configurations.
- NETCONF (Network Configuration Protocol) is a secure protocol that commonly uses SSH (Secure Shell) as its transport layer to apply those configurations to devices.
Together, NETCONF and YANG provide a transactional, programmable, and standardized approach to network device management. This provides an ideal solution for automating and integrating network management into modern DevOps workflows.
Major vendors like Cisco, Juniper, Arista, Huawei, and Nokia support NETCONF and YANG, and industry groups like OpenConfig and IETF have developed shared models to ensure interoperability. As a result, YANG and NETCONF provide an ideal protocol and modeling language for Puppet teams to automate their network devices. Puppet teams benefit from built-in error handling and rollback, with automatic change detection and reporting, that works with any NETCONF-enabled device.
Back to topHow It Works: NETCONF and YANG with the EdgeOps Module
Puppet Edge integrates NETCONF and YANG through the premium EdgeOps module and Puppet Bolt. With this integration, you can automate network device configuration with the same workflows you use for your servers and cloud resources. It’s perfect for when you want a centralized inventory of all your systems, including your network devices, and for centrally auditing all changes to your systems.
Instead of updating your network devices directly, use Puppet Edge and leverage the centralized infrastructure automation tooling.
Under the hood, the EdgeOps module has a few moving pieces. Read on for a quick overview of how the different parts of the puzzle come together to help manage network devices.
Key TerminologyYANG Models define what can be configured on a device, including:
NETCONF Protocol supports secure communication with network devices over SSH:
EdgeOps Module runs tasks against network devices:
|
The EdgeOps Flow
To understand the “EdgeOps flow,” see the following figure, which shows an example of how to use Puppet and the new EdgeOps module to manage a network device and gain all the benefits of a centralized automation orchestrator. In this example, Puppet Enterprise and the Puppet Enterprise console are used to trigger tasks against a network device. Imagine yourself in the role of a network engineer or a Puppet developer who must automate a configuration change to a network device.
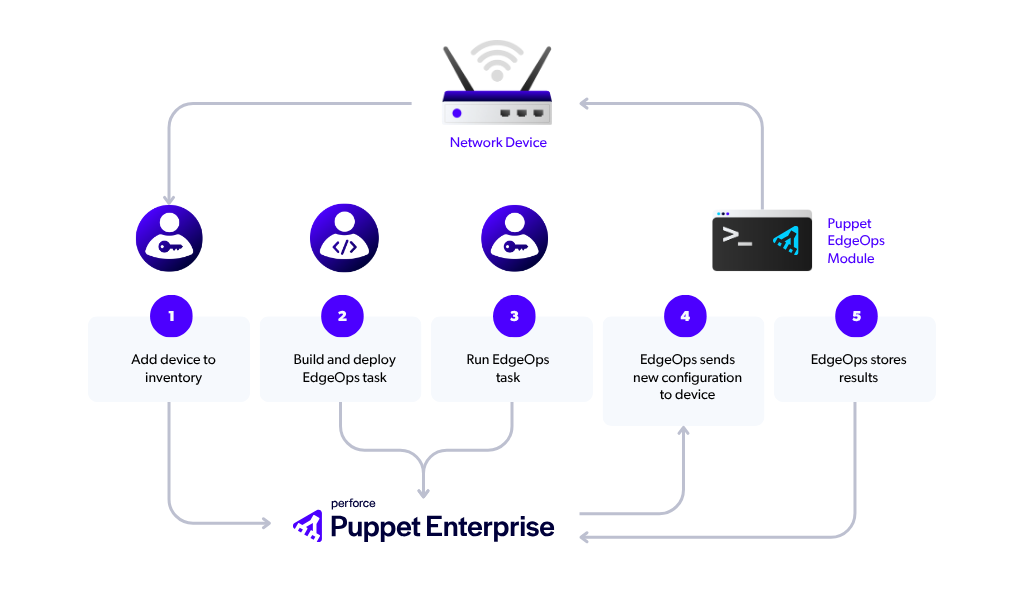
- Add device to inventory: Add the network device to the Puppet Enterprise inventory using the console.
- Build and deploy EdgeOps task:
- Create the automation for the Puppet Bolt task (JSON and RB files) and bundle as a module.
- Deploy the module to Puppet Enterprise.
- Run EdgeOps task:
- In the Puppet Enterprise console, define a task that targets the network device in the inventory, or a group that contains the device.
- Run the Task, triggering the EdgeOps module.
- EdgeOps sends new configuration to device:
- The EdgeOps module sends configuration commands to the device using the YANG model generated by the Puppet Bolt task.
- The device applies the configuration via NETCONF, validating the configuration against the YANG model.
🔐 Communication occurs over a hardened transport, using Bolt and NETCONF, helping to ensure security and reliability.
- EdgeOps stores results: Results are stored in Puppet for auditing purposes.
You can trigger the EdgeOps module in several other ways, whether using the CLI, Puppet Core, or workflows within Puppet Enterprise Advanced, but in each case the core principles remain the same.
Back to topUsing Puppet Edge Tasks and the EdgeOps Module
Puppet Edge tasks use the EdgeOps module to take actions on network devices over the NETCONF protocol. Opening sessions, editing the configuration, committing changes… all are provided as functions via the EdgeOps module.
As a next step, review the following code examples to see how DevOps teams might use the EdgeOps module and Puppet Edge tasks to manage an Arista cEOS switch.
ℹ️ Tip: All of code shown in this article is available on GitHub. After each code block, you can find a link to the hosted file.
Scenario 1: Create a User
You want to add a user to a network device with a specified username and SSH key and give them the
SYSTEM_ROLE_ADMIN role. What does a task look like for this scenario?
The task metadata (JSON):
You start by creating the definition of the Puppet EdgeOps task. This task metadata will define the parameters that the caller should provide, as well as dependencies required to execute the task. These look like Bolt tasks that you might already be familiar with, but you’ll notice in the following example that several edgeops files are referenced to ensure that the EdgeOps module can execute the task.
{
  "description": "Create a user and add an SSH key using OpenConfig system model.",
  "input_method": "stdin",
  "files": [
    "edgeops/files/task_helper.rb",
    "edgeops/lib/puppet_x/puppetlabs/netconf/client.rb",
    "edgeops/lib/puppet_x/puppetlabs/netconf/session.rb",
    "edgeops/lib/puppet_x/puppetlabs/netconf/redactor.rb"
  ],
  "remote": false,
  "parameters": {
    "username": {
      "description": "Username to create.",
      "type": "String"
    },
    "password": {
      "description": "Password for the user (cleartext or hash). Either password or ssh_key must be provided.",
      "type": "Optional[String]",
      "sensitive": true
    },
    "ssh_key": {
      "description": "SSH public key to add for the user. Either password or ssh_key must be provided.",
      "type": "Optional[String]"
    },
    "role": {
      "description": "Role for the user (required by OpenConfig AAA model). Common values: 'SYSTEM_ROLE_ADMIN' (OpenConfig standard), 'network-admin', 'network-operator'. Use 'bolt task run hal::discover_roles' to find available roles on your device.",
      "type": "String"
    }
  }
} The JSON file includes the following information:
- description: Describes the task, namely that a user will be created with a username and an SSH key or password.
- files: Lists the files that the server must deploy to the execution engine to support the execution of the task. Notice the EdgeOps dependencies.
- remote: Indicates where the tasks will run: locally or on a remote system. For network devices, no agent is available for deployment. As a result, the value will always be false.
- parameters: Defines the parameters that can be provided by the user or developer. Each parameter has a name, type, and description. You can reference the parameters in your code to have reusable pieces of parameterized logic. In this case, the task requires the username, the SSH key or password, and the role to grant the user on the device.
The task code (Ruby):
The code that will be executed by the Puppet EdgeOps module is provided in your task Ruby (.rb) file. The task runs in the context of a session, so EdgeOps will open the connection to the remote network device and then run your task code. The following example shows how to create a user that matches the task metadata:
#!/usr/bin/env ruby
# frozen_string_literal: true

require_relative '../../edgeops/files/task_helper.rb'
require 'puppet_x/puppetlabs/netconf/session'
require 'json'

result = PuppetX::Puppetlabs::Netconf::Session.with_session do |session|
  username = session.task_params['username']
  password = session.task_params['password']
  ssh_key = session.task_params['ssh_key']
  role = session.task_params['role']

  unless username && role
    raise "Missing required parameters: username, role"
  end

  unless password || ssh_key
    raise "At least one authentication method required: password or ssh_key (or both)"
  end

  auth_methods = []
  auth_methods << "password" if password
  auth_methods << "SSH key" if ssh_key

  session.logger.info("Creating user #{username} with #{auth_methods.join(' and ')}")

  # Build OpenConfig user XML using correct AAA model structure
  # Only include fields that are provided
  config_fields = ["<username>#{username}</username>"]
  config_fields << "<password>#{password}</password>" if password
  config_fields << "<ssh-key>#{ssh_key}</ssh-key>" if ssh_key
  config_fields << "<role>#{role}</role>"

  config = <<~XML
    <system xmlns=\"http://openconfig.net/yang/system\">
      <aaa>
        <authentication>
          <users>
            <user>
              <username>#{username}</username>
              <config>
                #{config_fields.join("\n                ")}
              </config>
            </user>
          </users>
        </authentication>
      </aaa>
    </system>
  XML

  session.edit_config(config)
  session.logger.info("User configuration applied to candidate datastore")
  session.commit
  session.logger.info("User configuration committed successfully")

  session.report_result({
    'status' => 'success',
    'username' => username,
    'role' => role,
    'message' => "User #{username} created and SSH key added"
  })
end

puts result.to_json The Ruby file includes the following information:
- The require statements are used to ensure that the EdgeOps and NETCONF libraries are available.
- The NETCONF session is opened using the PuppetX::Puppetlabs::Netconf::Session library.
- The task parameter values are read in from the session using session.task_params
- Input validation ensures that the required parameters have been provided.
- Configuration data is built in the OpenConfig XML format using the values of the task parameters that were passed in.
- The EdgeOps module attempts to apply the configuration change using session.edit_config(config)and session.commit
- Finally, a result is reported using session.report_resultThe task can add custom data to the output, and the result can be returned to the calling system to be included alongside the standard Puppet Edge session summary.
When you run this task, you will first provide the parameters to the task. Then, the EdgeOps module will connect to the device, create the user, set the password or SSH key, and commit the changes.
Scenario 2: Manage NTP Servers
One common responsibility of network administrators is to ensure that all nodes are using the same Network Time Protocol (NTP) servers so that system times are in sync. In this scenario, you’ll see how a Puppet Edge task can set the desired NTP servers and specify which one is the preferred server.
The task metadata (JSON):
As in the user creation scenario, this scenario requires task metadata to be defined in a JSON file. The dependencies will be the same for the EdgeOps pieces, but the task will have a different description and parameters that provide the information required to manage the NTP servers.
{
  "description": "Enable and manage NTP timeservers using OpenConfig on a NETCONF device.",
  "input_method": "stdin",
  "files": [
    "edgeops/files/task_helper.rb",
    "edgeops/lib/puppet_x/puppetlabs/netconf/client.rb",
    "edgeops/lib/puppet_x/puppetlabs/netconf/session.rb",
    "edgeops/lib/puppet_x/puppetlabs/netconf/redactor.rb"
  ],
  "remote": false,
  "parameters": {
    "servers": {
      "description": "List of NTP server IPs or hostnames to configure.",
      "type": "Array[String]"
    },
    "enabled": {
      "description": "Enable or disable NTP globally.",
      "type": "Boolean",
      "default": true
    },
    "prefer": {
      "description": "Preferred NTP server (optional).",
      "type": "Optional[String]"
    }
  }
} This JSON file differs from the Scenario 1 file in the following ways:
- description: A different task description, indicating the intent to enable and set the NTP servers.
- parameters: The parameters have the same format as in Scenario 1, but different specifications because this code requires different data: a list of NTP server IP addresses or host names; a Boolean to indicate whether NTP will be enabled or disabled; and the IP address (or host name) that specifies the preferred one to use from the list. Notice that Array[String] is used for the servers parameters.
The task code (Ruby):
As in Scenario 1, a Ruby (.rb) file is required for the task. The following sample implements the NTP scenario:
#!/usr/bin/env ruby
# frozen_string_literal: true

require_relative '../../edgeops/files/task_helper.rb'
require 'puppet_x/puppetlabs/netconf/session'
require 'json'

result = PuppetX::Puppetlabs::Netconf::Session.with_session do |session|
  servers = session.task_params['servers']
  enabled = session.task_params.fetch('enabled', true)
  prefer = session.task_params['prefer']

  unless servers && servers.is_a?(Array) && !servers.empty?
    raise "Missing or invalid required parameter 'servers'"
  end

  session.logger.info("Configuring NTP: enabled=#{enabled}, servers=#{servers.join(', ')}")

  # Build OpenConfig NTP configuration XML (strictly matching OpenConfig YANG)
  servers_xml = servers.map do |srv|
    <<~XML
      <server>
            <address>#{srv}</address>
          <config>
            <address>#{srv}</address>
            #{prefer == srv ? '<prefer>true</prefer>' : ''}
          </config>
      </server>
    XML
  end.join

  config = <<~XML
    <system xmlns="http://openconfig.net/yang/system">
      <ntp>
        <config>
          <enabled>#{enabled}</enabled>
        </config>
        <servers>
          #{servers_xml}
        </servers>
      </ntp>
    </system>
  XML

  session.edit_config(config)
  session.logger.info("NTP configuration applied to candidate datastore")
  session.commit
  session.logger.info("NTP configuration committed successfully")

  session.report_result({
    'status' => 'success',
    'enabled' => enabled,
    'servers' => servers,
    'prefer' => prefer,
    'message' => "NTP configuration applied successfully"
  })
end

puts result.to_json The Ruby file has the following differences from Scenario 1:
- The task parameters are read in, as in Scenario 1, but with different attributes because the task metadata has different parameter names.
- This time, the OpenConfig XML that is built up loops over the list of servers provided. This task builds up a list of NTP servers and specifies the preferred NTP server.
- This list of servers is then added to the final config, along with the enabled or disabled setting. The result is the final configuration, which can be sent to the network device.
As in Scenario 1, you provide the parameters, and the EdgeOps module connects to the device, applies the configuration, and commits the changes. The primary difference is in defining a different set of parameters and then building logic to use those parameters to build the configuration. The processes for establishing sessions and committing changes remain the same.
Scenario 3: Configure a VLAN
Another common configuration scenario is adding a new VLAN (Virtual Local Area Network) to a device. VLANs help to segment a network for subnets. In this scenario, a Puppet Edge task creates a VLAN on a network device. This slightly more complex scenario calls for conditional applications of configurations on the device.
The task metadata (JSON):
Similar to the previous scenarios, the task metadata will be defined in a JSON file. The dependencies are still the same for the EdgeOps pieces, but a different description and parameters are required to provide the information for creating the VLAN. An ID and name are required to define the VLAN. Optionally, the IP range of the subnet or a description can be specified.
{
  "description": "Configure VLAN with name, id, description, and routing IP addresses using OpenConfig models.",
  "input_method": "stdin",
  "files": [
    "edgeops/files/task_helper.rb",
    "edgeops/lib/puppet_x/puppetlabs/netconf/client.rb",
    "edgeops/lib/puppet_x/puppetlabs/netconf/session.rb",
    "edgeops/lib/puppet_x/puppetlabs/netconf/redactor.rb"
  ],
  "remote": false,
  "parameters": {
    "vlan_id": {
      "description": "VLAN ID (1-4094)",
      "type": "Integer[1,4094]"
    },
    "name": {
      "description": "VLAN name",
      "type": "String"
    },
    "description": {
      "description": "VLAN description",
      "type": "Optional[String]"
    },
    "routing_ips": {
      "description": "Array of routing IP addresses (e.g., [\"192.0.2.1/24\", \"2001:db8::1/64\"])",
      "type": "Optional[Array[String]]"
    }
  }
} This JSON file has the following differences from the previous scenarios
- description: A different task description to specify the VLAN scenario.
- parameters: The parameters have the same format as the other scenarios, but an optional array example is included with the routing_ips parameter. In addition, an integer example is shown with a specified range of valid values for the VLAN ID parameter.
The task code (Ruby):
As in the other scenarios, a Ruby (.rb) file is required for the task. The following example implements the VLAN scenario:
#!/usr/bin/env ruby
# frozen_string_literal: true

require_relative '../../edgeops/files/task_helper.rb'
require 'puppet_x/puppetlabs/netconf/session'
require 'json'

result = PuppetX::Puppetlabs::Netconf::Session.with_session do |session|
  vlan_id = session.task_params['vlan_id']
  name = session.task_params['name']
  description = session.task_params['description']
  routing_ips = session.task_params['routing_ips']

  unless vlan_id && name
    raise "Missing required parameters 'vlan_id' or 'name'"
  end

  session.logger.info("Configuring VLAN #{vlan_id} (#{name})")

  # Build OpenConfig VLAN configuration
  vlan_config = <<~XML
    <config>
      <vlans xmlns="http://openconfig.net/yang/vlan">
        <vlan>
          <vlan-id>#{vlan_id}</vlan-id>
          <config>
            <vlan-id>#{vlan_id}</vlan-id>
            <name>#{name}</name>
            #{description ? "<description>#{description}</description>" : ""}
          </config>
        </vlan>
      </vlans>
    </config>
  XML

  # Build OpenConfig interface configuration for routing IPs
  ip_config = ""
  if routing_ips && routing_ips.any?
    ip_config = <<~XML
      <config>
        <interfaces xmlns="http://openconfig.net/yang/interfaces">
          <interface>
            <name>Vlan#{vlan_id}</name>
            <config>
              <name>Vlan#{vlan_id}</name>
              <type xmlns:ianaift="urn:ietf:params:xml:ns:yang:iana-if-type">ianaift:l3ipvlan</type>
              <enabled>true</enabled>
            </config>
            <subinterfaces>
              <subinterface>
                <index>0</index>
                <config>
                  <index>0</index>
                </config>
                <ipv4>
                  <addresses>
                    #{routing_ips.select { |ip| ip.include?('/') && ip =~ /\d+\.\d+\.\d+\.\d+/ }.map { |ip| "<address><ip>#{ip.split('/')[0]}</ip><config><ip>#{ip.split('/')[0]}</ip><prefix-length>#{ip.split('/')[1]}</prefix-length></config></address>" }.join}\n                  </addresses>
                </ipv4>
                <ipv6>
                  <addresses>
                    #{routing_ips.select { |ip| ip.include?(':') }.map { |ip| "<address><ip>#{ip.split('/')[0]}</ip><config><ip>#{ip.split('/')[0]}</ip><prefix-length>#{ip.split('/')[1]}</prefix-length></config></address>" }.join}\n                  </addresses>
                </ipv6>
              </subinterface>
            </subinterfaces>
          </interface>
        </interfaces>
      </config>
    XML
  end

  # Apply VLAN configuration
  session.edit_config(vlan_config)
  session.logger.info("VLAN configuration applied to candidate datastore")

  # Apply interface configuration if needed
  if ip_config != ""
    session.edit_config(ip_config)
    session.logger.info("Interface configuration for routing IPs applied to candidate datastore")
  end

  session.commit
  session.logger.info("Configuration committed successfully")

  session.report_result({
    'status' => 'success',
    'vlan_id' => vlan_id,
    'name' => name,
    'description' => description,
    'routing_ips' => routing_ips,
    'message' => "VLAN #{vlan_id} (#{name}) configured successfully"
  })
end

puts result.to_jsonThis Ruby file differs from the other scenarios in the following ways:
- The task parameters are read in, as in other scenarios, but with different attributes because the task metadata has different parameter names.
- This time, two different OpenConfig XMLs are built up: one for the basic VLAN definition (ID and name, and possibly description) and another for the routing IP addresses.
- The EdgeOps module applies two edit_configs this time. In other examples, a single configuration was built. In this case, the interface configuration is sent to the network device as a separate, optional, edit_config operation. Both are committed with a single commit to the device.
As in the other scenarios, after the parameters are provided, the EdgeOps module connects to the device, applies the configurations, and commits the changes. The primary callout in this example is the idea of multiple operations with different configurations, rather than a single larger configuration. The processes of establishing the session and committing the changes remain the same.
ℹ️ How Were These Examples Built?
In these scenarios, the Puppet Enterprise Infra Assistant was used to generate the samples. Puppet Edge adds an MCP (Model Context Protocol) server that was used with Visual Studio Code and GitHub Copilot to generate the tasks.
For more information, see Infra Assistant: code assist.
❔Do These Examples Work Only for Arista cEOS devices?
The configuration format for each device can be different. The previous examples were generated by connecting to an Arista cEOS device, retrieving its device info, and building the task configuration XML based on that information. You should create tasks that are specific to the format required by your target device.
In this situation, the Infra Assistant code assist is invaluable. You can use it to spin up new tasks that fit your specific device, without having to reference a huge library of examples.
Back to topTips for the EdgeOps Module
To get the EdgeOps module up and running, follow the instructions in the installation documentation. Before you get started, review these key tips:
- Your target device must have NETCONF enabled for the EdgeOps module to connect. By default, network devices are typically configured with NETCONF disabled.
- If you are using Puppet Core, the EdgeOps module must be installed separately and requires a Forge entitlement.
- If you are using Puppet Enterprise or Puppet Enterprise Advanced, the module is already installed. You do not have to install the module, but activating the module does require a special entitlement for Puppet Edge on your license. Don’t forget to restart your services after installing a new license!
- The format of the configuration can be different depending on the device. Make sure you retrieve the required information about the target device to build your EdgeOps tasks correctly! Specifically, you can use the EdgeOps task edgeops::netconf_discover to list all schema information and then drill into view-specific schema content by using the get_schemas action. For details, see the documentation about running built-in tasks.
What’s Next?
We are just getting started with Puppet Edge and networking devices. Keep an eye on our release announcements as Puppet creates a single orchestration layer across your entire infrastructure. The new EdgeOps module is just one piece of Puppet Edge that allows network management teams to start leveraging the power of Puppet across Day 0, Day 1, and Day 2 operations.
Want to learn more right now? Check out these official docs and other resources to help you get started:
- Expanding Your Infrastructure Automation Across the Lifecycle Using Puppet Edge (puppet.com)
- Build Tasks for Network Devices Faster with Code Assistance and Puppet Edge (puppet.com)
- Packaging Operations Runbooks with Puppet Edge Workflows (puppet.com)
- Puppet EdgeOps module (forge.puppet.com)
- Install the EdgeOps module (help.puppet.com)
- Puppet Bolt documentation (help.puppet.com)
- Installing Puppet Bolt (help.puppet.com)
- Task metadata (help.puppet.com)
- Writing custom tasks (help.puppet.com)
- Running built-in tasks (help.puppet.com)
- Puppet EdgeOps example tasks (github.com)
- Puppet Edge official product page (puppet.com)