Blog
November 18, 2021
How to Connect Puppet Enterprise to Okta Using SAML

How to & Use Cases,
Products & Services
In this post, I will give a step-by-step guide on how to connect Puppet Enterprise to Okta using SAML. This will allow you to use the same credentials to log in to the application as you use for other applications integrated with Okta. The "User ID" and password are stored centrally, meaning that you don't have to manage separate credentials to access the Puppet Enterprise Console.
Back to topWhy Connect Puppet Enterprise to Okta?
Nowadays, staff in organizations are required to access multiple applications in their infrastructure. This can lead to the user having to manage multiple login credentials and passwords. There are many solutions available that provide a single sign-on (SSO) capability — such as Okta, LDAP, and Active Directory — which is becoming common practice across businesses.
You may be wondering why you’d want to connect Puppet Enterprise to Okta. Okta enables you to log in to a single application without being required to enter your credentials for any other application that has been integrated.
If you have multiple applications running on premise, in the cloud or on a secure network, managing access with SSO provides a single entry point for those applications on your infrastructure. This simplifies securing access to Puppet Enterprise and, with the correct RBAC permissions configured in the Console, will allow users the right level of access for managing the platform.
Back to topWhat’s SAML?
First things first: What’s SAML? Security Assertion Markup Language (SAML) is the authentication protocol that is used for integration by enabling communication between the identity provider (idP) — in this case, Okta — and the service provider. The Puppet Enterprise console is then accessed with trusted information. meaning that the user only has to authenticate once; the idP service is used to store and maintain user information for each single login.
Back to topHow to Connect Puppet Enterprise to Okta
Connecting Puppet Enterprise to a SAML idP is possible as of version 2021.2.0 and in this blog I will demonstrate how to integrate Okta with Puppet Enterprise. I will be using a development Okta instance. You can also request an instance from the vendor’s website.
Once you have an instance and can connect to it from Puppet Enterprise, you are ready to proceed.
The very first step is to log in to Puppet Enterprise with an administrator account, then from the left menu under "Admin" click "Access control" and select the "SSO" tab.

The information presented on this screen will be added to the application configuration pages, make a record of the default Assertion Consumer Service (ACS) URL, and note the "SAML" metadata URL and the "SAML Single Logout URL."
Hint: Create a file containing the "Identity provider certificate" that will be uploaded to the Okta configuration "Advanced Settings" later.
Back to topConfigure the Okta Application
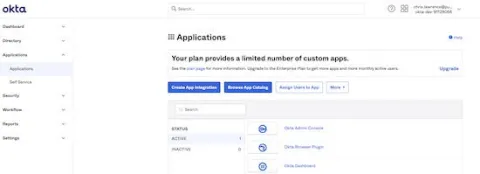
Log in to the Okta Admin Console and from the left hand menu under the "Applications" option select "Applications." Click "Create App Integration" and the "App Integration Wizard" will start.
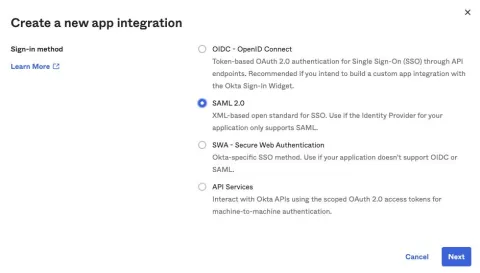
Create a new app by selecting "SAML 2.0" in the Sign-in method window.
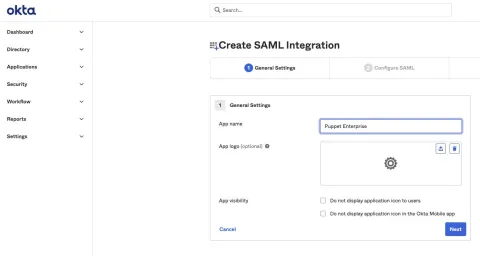
Now you can configure the SAML integration under "General Settings," add the application name in the "App name" field and optionally upload an image, then click "Next."
Complete the General "SAML Settings" section by adding the "Assertion Consumer Service (ACS) URL" in the "Single sign on URL," and the "SAML metadata URL" in the "Audience URL (SP Entity ID)":
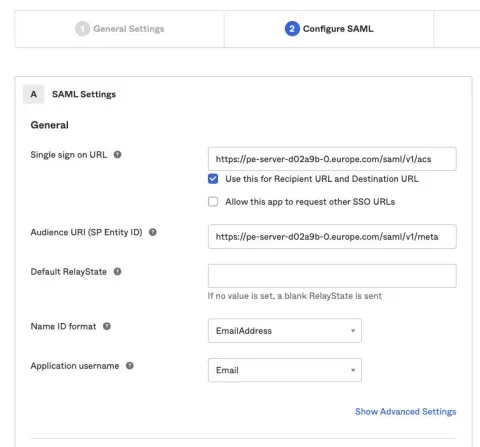
Hint: I wasn’t sure what settings I needed to apply here so I hovered over the icon which helped me work out the correct configuration.
In the next step, expand the "Advanced Settings" and input the parameters that will need to match the "Service provider configuration options" in Puppet Enterprise (you will add those later).
Make sure you select the "Allow application to initiate Single Logout" checkbox and add the "Single Logout URL" information that was taken from the Puppet Enterprise Console settings. Also add the "Assertion Consumer Service (ACS) URL" in the "SP Issue" field, then upload the "Identity provider certificate" in the "Signature Certificate" field.
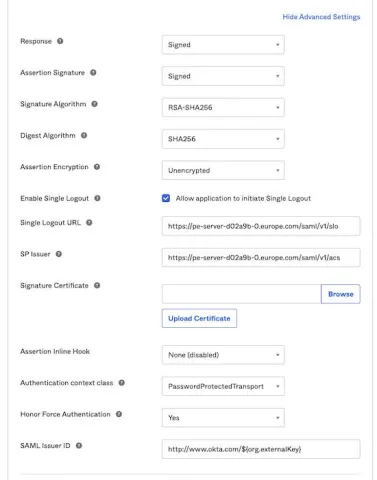
Note: The "Authentication context class" setting will be used in the Puppet Enterprise configuration, so make a note of it because it is referenced later in the blog.
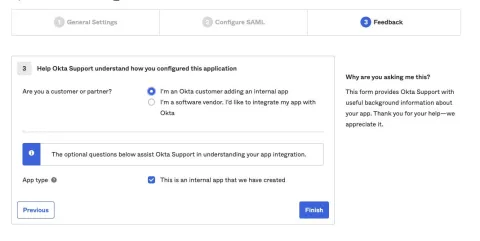
Click "Next" at the bottom of the SAML Settings page and optionally provide "Feedback" information, then select "Finished" to complete the Okta application configuration.
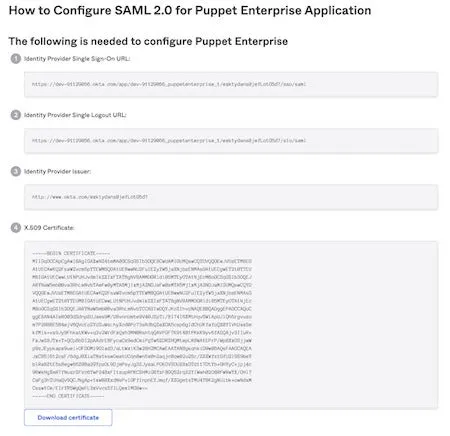
You will be presented with the details on how to configure SAML 2.0 for the Puppet Enterprise Application. As stated on the page, write down these settings because you are going to use them in the next step.
Puppet Enterprise Integration
Log back into Puppet Enterprise and once again from the left menu select the "Access control" menu, then under the "SSO" tab click on "Configure."

Add a "Display Name" that will be visible on the Puppet Enterprise home page. Then, in the "Identity provider information," add the information that was retrieved from the "Configure SAML 2.0 for Puppet Enterprise Application" page earlier.
The "Identity provider entity ID" is the "Identity Provider Issuer" details, the "Identity provider SSO URL" is the "Identity Provider Single Sign-On URL" and finally the "Identity provider SLO URL" is the "Identity Provider Single Logout URL."
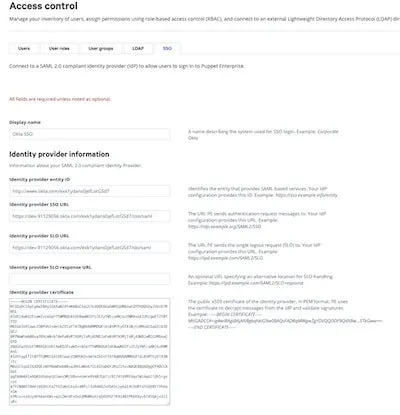
Note: You can leave the "Identity provider SLO response URL" blank because it’s optional; however, you must paste the "Identity provider certificate" into the field.
When selecting the Service Provider configuration options specific to the Okta application, it is important that the correct information is added in PE, otherwise the integration will not work correctly. Apply the settings exactly as you see them in the example configuration below:
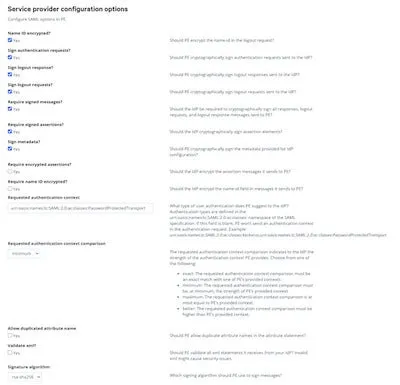
Hint: We made reference to the "Authentication context class" earlier when configuring Okta. That setting should be added to the "Requested authentication context" field in this format: "urn:oasis:names:tc:SAML:2.0:ac:classes:PasswordProtectedTransport". The "Signature algorithm must be the same and set the "Requested authentication context comparison" to "minimum."
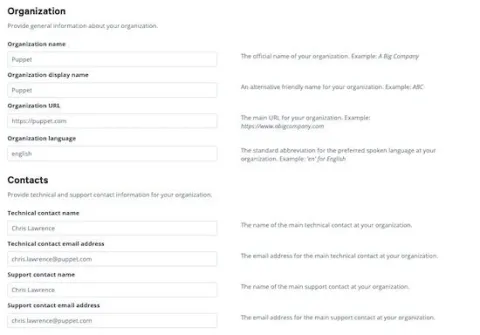
Add your organization contact information specific for your company, and any relevant contact information into the form.
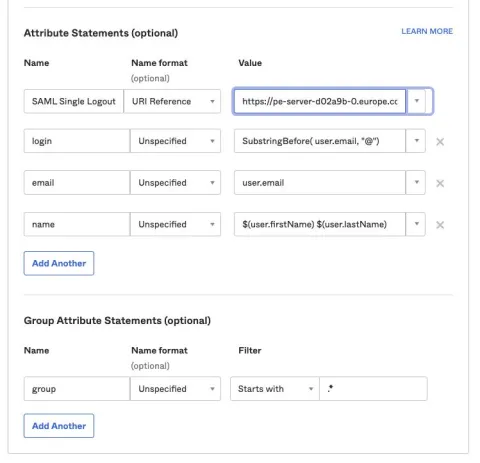
The “Attribute Binding” configuration must be exactly the same as what’s in the Okta application. These settings provide attributes and map them to different pieces of information about a user. The settings allow PE to correctly interpret the meaning of those mappings.
The Okta Administrator should provide the details or you can retrieve them from the Okta application menu, then go to the SAML General, Advanced settings. Notice that the "Name" parameters are added to the "Attribute binding" field in the previous screen above:
When the form is completed with all mandatory data, and any optional settings applied, click "Commit Changes" at the top of the page.
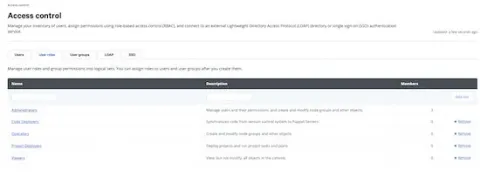
Back to topRole Based Access Control (RBAC)
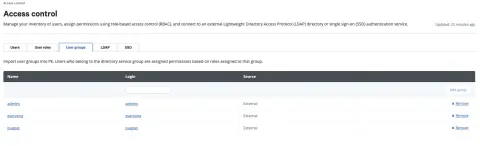
A new tab is now available on the "Access Control" page called "User groups." You should configure the "Groups" that will be assigned from the Okta Application.
For example, in Okta, my user ID is in the "Admins" group as a SuperUser, where users in the "everyone" group have unprivileged access.
If you want to configure users in the "everyone" Okta group to the "Operators" role in Puppet Enterprise, select the "User roles" tab, then click on "Operators":
In the "Member users" tab select the "User name" dropdown and you will notice data that was detailed in the Okta application "Attribute Statements" page:
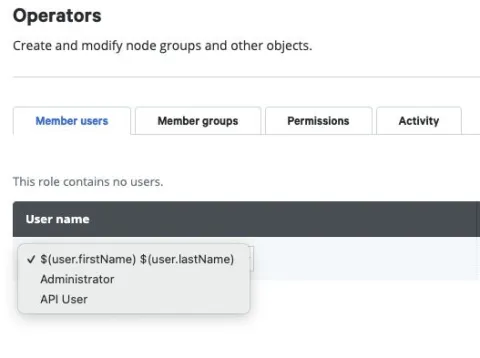
Hint: If the user attributes that are provided in Okta are not displayed, check that the Attribute settings in Puppet Enterprise match the Attribute statements in Okta.
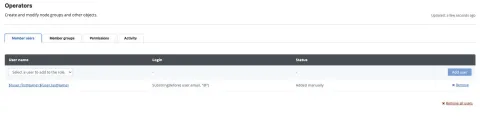
Click the "User name" as defined in the Okta application "Attribute Statements" page, the "Login" field will automatically be populated with the related parameter and the "Status" field will state "Added manually."
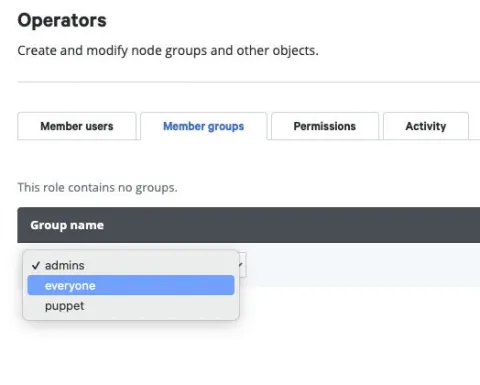
The final step is to select the "Member groups" tab and under "Group name" select the "everyone" group:
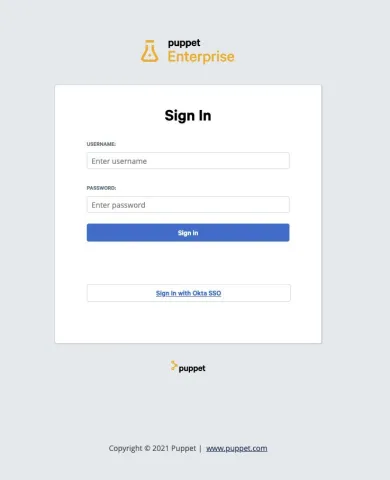
Commit the changes to complete the integration process, and that's it! Navigate to the Puppet Enterprise login page and you should now see "Sign in with Okta SSO."
Click it and if everything has been configured correctly you will be redirected to the Puppet Enterprise Status Page.
Have fun configuring your Puppet Enterprise Server with your selected SSO SAML application!
Back to topFollow Along with a Demo in a Puppet Tackle Box
At Puppet, we’ve created Tackle Boxes that are consultative guides for helping customers with using and configuring Puppet Enterprise. These guides walk you through the process with step-by-step instructions to get things up and running.
Specific to this blog, log in to the Tackle Box Catalog and select the Tackle Box for Connecting PE to a SAML Identity Provider that provides an easy to follow demonstration.
Learn More
- Explore FreeIPA LDAP for Linux/UNIX or Google Cloud LDAP for GCP
- How to use Role-Based Access Control (RBAC)